Pages

Saturday, March 24, 2012

Green Ripple Brim Hat

Yesterday this blog reached 100,000 total page views!  Thanks, everybody!  Hopefully I can keep coming up with things that people want to see.  (-:

Today I have another hat for you.  I guess I was getting bored with scarves.  I sat down and started making hats and I've been making almost nothing else since.  Hats are great.  I like them because I can make one in something like 2 or 3 hours, less than that if I don't bother to make notes of what I'm doing.  I am trying to break that habit since I can't share a pattern that I don't have written out.  Anything that goes that fast is usually pretty satisfying to make.  Hats also chew through a pretty good amount of yarn which is good since I'm trying to reduce the stash. 

The new routine seems to be plug in a movie, make a hat.  I made two while I was watching the 1959 version of Ben Hur.  That's the Charlton Heston one, in case you're curious.  I do have to differentiate because there are multiple versions of Ben Hur and I have 2 of them.  I'll be watching the silent version from 1925 pretty soon.  Supposedly it's chariot race is more impressive than in the 1959 version.  The only downside is that it's really hard to do anything when you're watching a silent film.  You really do have to see all the narration boards if you want it to make sense.  It's all good, though.  I just got an epic box set of Kubrick 9 films (pretty much all of the films he made from Spartacus on) and none of them are silent.  None of them are short, either, so I should have lots of time in which to make things.  Who knows, maybe I'll get inspired.  I've heard A Clockwork Orange is pretty freaky and I tend to come up with neat things while watching unusual movies. 


Green Ripple Brim Hat


Fits a 22 inch head snugly.

Materials:

75g (about 140 yards) Red Heart Super Saver
I hook
Gauge:  Round 1 should be about 2 inches across.
            A pair of 3dc clusters is 2 inches across.


Pattern:


Note:  Start the first cluster on every round using a ch2 as a substitute for the first dc (as done in Round 1).

Ch6 and join in a loop.
Round 1:  Ch2, 2dc in same space. Ch1, 3dc cluster, ch1 four more times.  Join and turn.
Round 2:  Sl st in ch 1 space.  (3dc, ch1, 3dc) cluster in each ch1. Join, do not turn.
Round 3:  (3dc, ch1, 3dc) cluster in each ch1 and between each cluster.  Join, do not turn.
Round 4:  Slst to the first ch 1.  Make a 3dc cluster then make a full (3dc, ch1, 3dc) cluster in each remaining ch1 sp. Finish the first cluster with 3dc, ch1 and join.  Do not turn.
Round 5 & 6:  Make a (3dc, ch1, 3dc) cluster in each ch1 sp and between each cluster set.  Break off and weave in ends.
Adjust piece so that the 'wrong' side faces out, it's a texture thing.


Friday, March 16, 2012

Lacy Slouchy Hat

I know, I know, I've been neglecting the yarns.  Inspiration for interesting things has been hard to come by lately, at least in yarn form.  I've been having a great time making Halloween decorations.  Actually, that isn't completely accurate.  I've mostly been planning the decorations out, learning the techniques I need to make them, and doing some practice work.  There are a lot of changes that have been required and, as suspected, several bits are taking more work than expected.  Of course, that is about par for crafting.  But I know that most of you visit my ramblings for patterns and I have been seriously remiss as far as that goes.


I also have a remarkable ability to be distracted.  My attention span is about ooo, shiny!  Which decidedly does not help.  Since my patterns haven't been coming together quite like I would like, I decided to make something that would allow me to debut one of my new toys.  Toy, actually, is probably a bit of a misnomer as it isn't something that can be played with in the conventional sense.  On my wonderful shopping foray with my mom a few weeks ago I found a bunch of neat stuff.  One put me in transports of joy for days.  The toy in question is a glass head.

That isn't a typo, I did actually find a human head made out of glass.  It's life sized and everything.   I'm guessing that most of you are now staring at this with the same expression I had when I saw a shelf of glass heads at Ross.  Its the look of WTF?  In my case though, it took the time it takes to say "Who in their right mind would buy a ... I NEED A GLASS HEAD!" that look of WTF turned into a burning desire to get said glass head.  Clearly I am not in my right mind, I always have preferred my left mind anyway, but if you've been reading this blog for any length of time you probably figured that one out a while ago.  The important thing is that I now am in possession of a glass head.  Getting it when I did turned out to be a good idea, too; I went back to Ross the very next weekend after getting the head and there were none left.  This leads me to believe that there are, in fact, people crazier than me out there.  I can think of several reasons why I would need a glass head, but I can't think of any reasons for someone else to need one unless they want it for the same reasons I did.  Since the purposes to which I intend to put the head are vastly different from each other, I would be very surprised if other people got the heads for the same reason.

My reasons for getting the head are very simple.  I didn't like the foam head I got to display my hats.  It fell over a lot because it was so light and I had to pin my hats to it for it to work at all.  I don't like having pins out in my open spaces, they tend to disagree with the cats.  The glass head, though, now there was an improvement.  It's heavy.  Like probably close to 10 pounds heavy, I haven't weighed it so that's just an estimate.  The head is also well balanced and doesn't care if it has a hat on it or not.  It continues to sit where ever it was placed.  So, score one happy for successful hat display.

Reason number two for the head's greatness is a little special.  The head is hollow, you see.  Hollow and made of glass.  Those to facts chased each other around for a while and finally "meat head" came out.  You see, when you make a meat head, you have to have a form to build the layers on.  Most people use Bucky skulls or something similar for that but I was having a hard time with the idea of putting food on something with lots of little crevices.  Getting anything like that clean takes way more effort than I'm willing to expend and I can't use it or store it unless it's clean.  None of that is an issue with the glass head.  It's nice and smooth and, well, glass.  The nice thing about glass is that it holds temperatures reasonably well.  So if I build my meat head on the head after having chilled the head not only should the cream cheese stick to the glass better but it will also help keep the meat cold.  Especially after I get done filling the head with ice.  It's hollow, remember.  Before serving all I have to do is fill the head with some crushed ice and I have a refrigerated meat head.   Squee!

Anyway, what all my rambling amounts to is that, even though I couldn't think of anything interesting to make I really wanted to show off the head.  The best way to do this was to make a hat, so that's what happened.  Hats are pretty easy to bang out, too, which helped.  It's very hard to devote a lot of time to something that you can't bring yourself to care about so having a quick project really helped.  The hat turned out super cute despite my complete lack of interest in it.  Hopefully the weather will sort itself out soon and I can go back to being human and creative.  Hats are pretty free form to make and they don't take terribly long to do.  This one only took a couple of hours.  I do mean that quite literally; I think this hat took 3 hours or less to make.  It's another in the "Rasta tam" style because I quite like that style.  They can cover your neck and ears, you see.  This is important when you have short hair and get cold very easily.


Lacy Slouchy Hat


Fits a 22 inch head comfortably.


Materials
80 grams (about 150 yards) Red Heart Super Saver, I used "Aruba Sea"
I hook


Hat Pattern
ch1
Round 1:  8sc in the ch1, join but don't turn.
Round 2:  ch 5, sc in each stitch around.  Join and don't turn.
Round 3:  Ch1 and 5sc in each loop all the way around.  Join and don't turn.
Round 4:  ch5 and sc in the third sc of each loop.  Work until you get to the last loop.  Ch2 and dc in the starting st.  Turn.
Round 5:  (ch5, sc in the loop space) around until last loop then ch 2, dc, turn
Rounds 6-10:  Repeat round 5.
Round 11:  (ch5, sc) around in both loop and sc of previous row.
Rounds 12-23:  Repeat round 5.
Round 24:  (ch1, sc in lp) around.  Join and turn.

Round 25-26:  Work all sts in sc, join and turn.

Round 27:  Ch 2.  Sc, dc (moss st) around ending on sc.  Join and turn.
Round  28-29: repeat rounds 25-26.  Break off, weave in ends.

Pretty flower in the center (-:

Saturday, March 10, 2012

Adventures in Bottle Cutting

**This post involves a method for breaking glass.  Please take any and all precautions as indicated by the packaging of the tools used to ensure your safety.  Safety goggles and gloves are your friend!  Broken and cracked glass WILL have sharp edges so be careful that you don't cut yourself.**


I'm learning a new skill!!  I had thought about bottle cutting a while back and just kinda dismissed the idea, not really sure why.  Then I got to thinking.  If I cut up some bottles, and smoothed the edges down, I could use those for beakers instead of shelling out money for real labware.  Labware has a tendency to be very pricy.  Anything that has measurements on it has to be reasonably accurate and the smaller the measurements the harder that is to do.  Consequently, the more accurate you want your stuff to be the more it costs.  Now, I don't really need anything that measures accurately...well, not for party purposes anyway...so having graduated glassware isn't really necessary (graduated in this case means "marked with measurements" because scientists can't say anything simply).  I just need stuff that looks cool.  The other nice thing is that bottles are pretty easy to come by.  I have any number of households that I can tap for wine bottles, mine included, so it's not like I would have to spend more to get bottles.  Go, recycling!  Actually, this is probably repurposing or upcycling (honestly, can you keep track of all the new terms?  I know I can't.  What happened to plain old "recycle, reduce, reuse"?) but either way it's better for the environment than just throwing the bottles out.  Repurposing is even better than recycling since the bottles won't have to be melted down (which uses fuel) or anything like that.

Having established bottle cutting as a viable craft for my purposes the only thing left to do was get a bottle cutter and start cutting...or so I thought.

A quick run out to my local craft store netted me a bottle cutter that wasn't terribly pricy.  I had a 40% off coupon too, which certainly didn't hurt.  The method it uses is "score and tap" where the idea is that you etch a line around the bottle and then tap it with the hammer (not a normal hammer, it's actually just a bit of shaped aluminum but it's called a hammer probably because of the tapping).  The score line is supposed to weaken the bottle enough that with gentle and repeated tapping the bottle with crack along the score line.  This the point where you realize that "bottle cutter" is a bit of a misnomer.  You don't actually cut the bottle, you just break it in a very controlled manner.  Unfortunately, that was where I hit my first hurdle.  The assembly of the scoring jig was a bit iffy and the layout just didn't make sense.  Still, I persisted and was able to get a score line, or rather, something that looked like it could be a score line eventually.    The problem ultimately turned out to be that there was no good support for the bottle so my score lines (I did a bunch of them for practice) weren't straight or continuous.  They sloped up and down as the pressure I applied to the bottle caused the base to slip which in turn would cause me to have to reposition the bottle and try to restart the line.  It was very frustrating.  If I didn't apply direct pressure the blade wouldn't etch at all but if I applied direct pressure the bottle moved.  The reason it matters is because the bottle will break along whatever line happens to be there, not that I ever got that far.  My several attempts at a decent score line had also started giving me something that felt like tennis elbow.  ARGH!


It was time to consult the interwebs.  That in itself was a terrifying experience.  The most prevalent DIY method for bottle cutting seems to be "flaming string" which is enough to give you nightmares if you actually think about what it involves.  For flaming string you soak a bit of string or yarn (hopefully of the natural fiber variety, I can't imagine using a synthetic would be anything like a good idea) in alcohol or acetone, wrap it around the bottle where you want it to break and light it on fire.  Once you've evenly heated the bottle around the burning string line, you dunk it in cold water and the bottle cracks off at the string line.  Now, admittedly it sounds really fun (and you get to play with fire and everything!) but that's exactly the reason why I know this can't be a good idea.  Nothing that sounds that fun is EVER a good idea.  For starters, burning acetone makes some really funky fumes (yeah I've set acetone on fire before. In case you're wondering, I really don't recommend it.  Learn from my mistakes, people!) which you won't be able to avoid breathing; you have to hold and rotate the bottle so you can't get away from the flame.  Using alcohol is a little better fume wise but then you run into the issue that both the alcohol and acetone have.  They burn, and burn, and burn plus their fumes are flammable.  That means if you leave drip lines anywhere or there's too much liquid on the string and it drips off the fire is going to follow it.  You may think you're being careful but I'll tell you right now it isn't worth the risk.  I taught a fundamentals lab for microbiology where students were taught how to sterilize glass tools by dunking them in alcohol and then lighting the alcohol with a Bunsen burner flame.  This was a controlled environment with someone (me, in my classes) supervising who had used the technique countless times.   Still, at least once a semester we would have a student really light things up.  Once we had a student light the entire bench on fire.  You would not believe the number of times we had fires even after everyone got the process figured out.  Happily, they were usually tiny fires.  Usually a flaming drop would fall and hit a vapor trail or something and before you know it, the jar is burning like a campfire and so is any alcohol that hit the bench.  Your choices then are to let it burn out on its own or suffocate it, nothing else works.  Sill, setting a lab bench on fire is surprisingly OK because they are built to handle that kind of abuse; your kitchen counters and craft tables probably aren't.  None of that even goes into the quality of the glass or the evenness of the heat stress line.  Having problems in that area can do things like make the bottle explode.  Needless to say I most emphatically do NOT recommend using the burning string method.  I'm rather attached to my skin and lungs and so try to avoid things that have a good chance of damaging them.  I'm also quite fond of my kitchen, it is where the food comes from after all, and prefer it to stay functional.

There was a light at the end of the tunnel, however.  My mom found the website of a guy named Ephrem and it looked amazing.  We watched his 
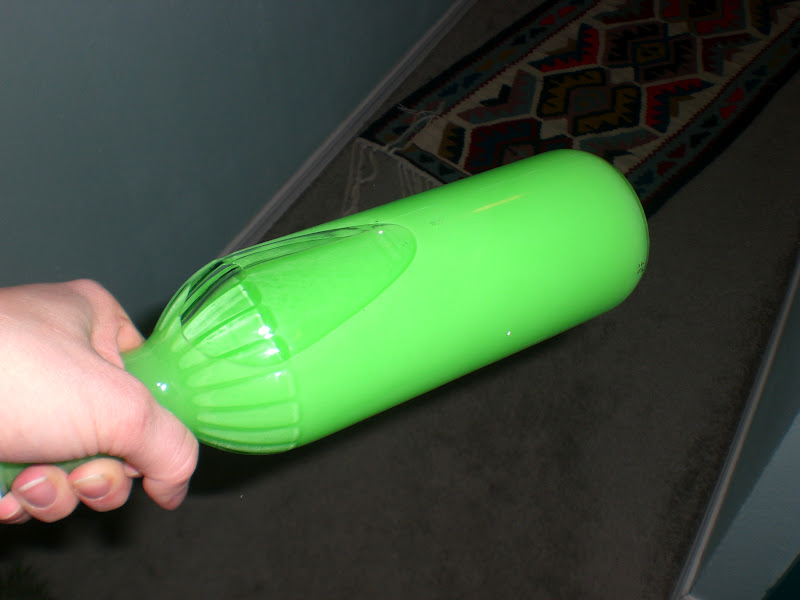
video and were amazed how simple his system is.  You score the bottle and heat the score line over a candle.  Then, when the bottle is hot enough, you run an ice cube over the score line.  The hot-cold contrast stresses the glass the same way the flaming string method does but this one is much more well controlled and considerably less dangerous.  You're also only dealing with a candle which burns at a lower temperature than alcohol and the slow separation has to cut down on the number of oops explosions and other problems.  In the video it took him a few applications of hot and cold to get the bottle to break but once it did break the edge was enviable.  The break line was nice, even at the edges, and apparently only took a small amount of polishing to dull it enough to be safe.  I conceded the loss with the other cutter (which also happens to be impossible to disassemble and therefore impossible to return. Are we surprised?  Not really.) and ordered Ephrem's deluxe bottle cutter (it has an adapter that will allow cutting on the curved edges of bottles).

Ephrem's bottle cutter with adapter.  I had turned the back stop around by this point.
I was a little nervous about the cutter because I had seen some really negative reviews of it.  But then, with most of the cutters available people either seem to love them or hate them.  There isn't a middle ground.  You'll see one and five star reviews almost exclusively.  The most negative reviews for Ephrem's bottle cutter said that the glass won't break cleanly and that you'll be left with a sooty, jagged mess.  The most common complaint was that the adapter didn't always come with the set when it was supposed to.  This apparently was due to resalers not knowing what the difference was between the standard and the deluxe model.  The most positive said that it works exactly as advertised and is really easy to use with great results.  So, like most things, I figured it had about a 50/50 chance of working out.  I would just have to wait and see.

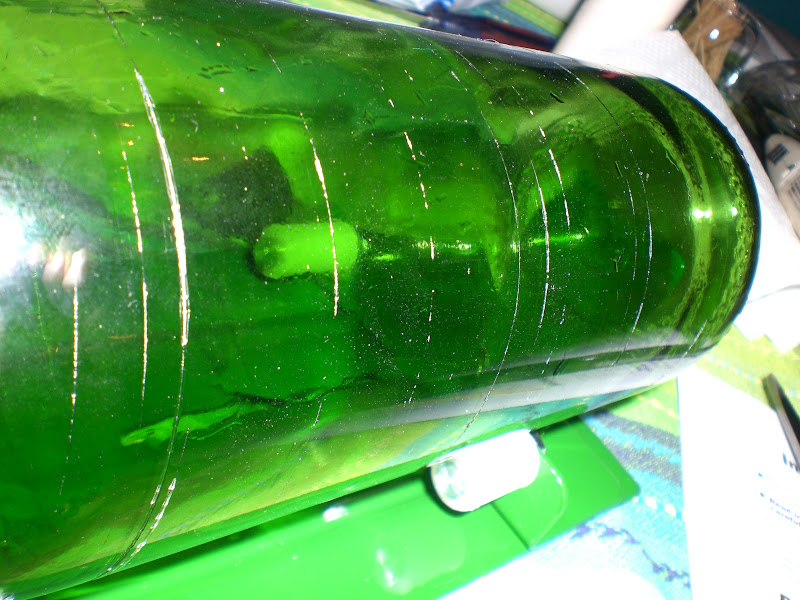
The extremely prompt response I received gave me hope; I heard from Ephrem a few hours after I placed my order, and on a Sunday no less. You don't always get that kind of service with random website Paypal purchases.  While waiting for my bottle cutter to arrive, I cleaned up a few bottles that I had about the house.  Nothing fancy there, just a long soak in warm water to loosen the label followed by some paper peeling and a quick scrub with one of my scrubbies to get the adhesive off.  Plus I still had the practice bottle for my first tries at a score line.  I kept it around because, with the number of attempted scores it has, it won't be useful for anything besides preventing me from wasting bottles.

See all my pretty (and not so pretty) score lines?  This is my practice bottle.  Just a quick note, if you use a practice bottle like this you have to make sure that none of your lines overlap bc it can damage the cutting blade.
My bottle cutter arrived on Wednesday, which pleased me greatly.  Three day turnaround is not something I expect out of anyone but Amazon.   Excited about my new toy, I promptly grabbed my practice bottle and had a go with it.  The difference between Ephrem's bottle cutter and the plastic one I got at Michael's was astonishing.  It worked so easily!  My score lines stayed nice and straight and the whole setup worked exactly as advertised.  I did have to tinker with the jig a bit; it didn't have the range that I wanted.  It was set to something like juice glass length and I had wanted to try my first cut higher up the bottle than that.  The solution was quite simple, I just took the back stop off and turned it around.  Much better range, and I really like how adjustable the setup is.  I did notice  that the adapter that lets you cut on curves is a little loose.  I think I'll have to tighten the nut securing it considerably before using it otherwise the piece moves and the score line will move with it.  I haven't tried that yet, but I'll let you know how it works out when I do.  With more use I may make a few more alterations.  For instance, I've heard that bolting it to a cutting board can be really helpful.


Having assured myself on the practice bottle that I could get something like a good score line I picked up a fresh bottle and tried it for real.  The score line went marvelously and with no hand or arm cramps which meant it was time for the moment of truth; it was time to heat shock the score and cut the bottle.

Sorry for the lack of pictures here, but I only have two hands.  I couldn't manage to rotate the bottle over my candle and shoot what I was doing at the same time.  For the heat shocking you heat the score line over a candle and then touch it with ice.  Oddly enough, this is the bit that I think is going to take the most practice.  I saw some negative reviews about how this method with leave a sooty mess on your bottle.  It is true that if you put the bottle in the candle flame it will soot the bottle.  That's why you hold the bottle a bit above the flame.  It just takes some practice.  I did get a couple of smudge marks on the glass, but that was because I was trying to figure out the best way to hold the bottle and how to rotate it smoothly.  The other bit that takes some patience is getting the bottle hot enough to crack on the score line.  It took me three tries to get it to break, but again that would be inexperience talking.  Finally I heard the little popping noised that indicated the score was cracking.  It didn't break all the way off so I did another pass with the candle and POP!  there it went!  One nicely cut bottle!  I dried it off and took a look at the edge and saw immediately that all the negative reviews I had seen were very, very wrong.  The edges were sharp which was to be expected, it is technically broken glass, but the edge itself was as close to perfectly even as it's possible to get.  


Unpolished cut edge.  It is sharp, but the variations around the edge are too subtle for my camera to pick up.


The edge was so nice, that I could actually put the bottle back together!  According to another guy's website, he cuts bottles with a score line and hot and cold water, it should be possible to have the bottle hold water at this point as long as there is pressure holding the bottle together. 


I waited a few days until I could cut a few more bottles, and get some parts, before I sat down to polish the edges.  In his videos, Ephrem uses a piece of glass as a base for the polishing process. I thought about that for a while and did a bit of research.  Glass on glass polishing is actually one of the best methods so I figured it was time to get some plate glass.  I started with my local hardware stores and was very disappointed to find out that neither of them sell piece of plate glass or Krylon Looking Glass spray paint.  I'll tell you more about that second bit in a later post.  I was then hit with a stroke of brilliance and decided to go to Ross in search of a small glass cutting board.  This seemed like a superior solution to just a piece of glass because the cutting board has nice smooth edges and little gripper feet so not only can you not cut yourself on it, it also won't walk away while it's in use.  The cutting board has the additional advantage of being a good size to store.  I returned home with my prize and cut my remaining bottles so that I could do a round of polishing and call it good.

I'm glad I did a few more bottles, too.  I learned some very useful things that I can now share with you.  All three of the bottles I had were clear glass and two of them were from the same winery.  The loner bottle cut like a dream but the sibling bottles did not.  I think this is one of the points where people get frustrated.  The matching bottles scored well enough, I had to redo one of them because the line I got was mostly oil and not score mark and you aren't really supposed to re-score the bottles, but when it came to separating the pieces things went wonky.

This was the first of the matched pair that I separated.  I'm not sure which of the two had the repeat on the score line, I think it was this one.  On this particular bottle the crack you see in the picture happened when I was icing the score line.  It came apart really easily so I didn't have to decide if it was a good idea, or not, to put it back in the candle flame.  I had heated the glass a little longer than I had intended, something like 3 minutes, and the glass turned out to be thinner that I had thought so it is entirely possible that the crack was do to either excessive heat or a flaw in the glass itself.  I don't know enough about glass to be able to say for sure but I suspect it was a combination of the two.  I have been to the Corning Museum of Glass (we went in 2011.  It's really awesome, you should check it out if you're ever around Corning, NY) and what I remember of their various exhibits and demonstrations does fit the flawed glass hypothesis really well.


This was the second of the twin bottles.  I heated it for a lot less time than I did the first bottle.  This one only got heated for maybe a minute before applying the ice.  As you can see, the break was not a clean one. The break line deviated from the score line in a number of places, the most obvious of which is shown.  Since I had problems with both bottles that very likely came from the same lot of bottles (the wine was purchased on an actual visit to the winery where it was made and I believe both bottles held the same thing, which means they were probably bottled in the same batch and therefore came from the same lot of bottles) I figured that the problem was likely the quality of the glass used.  I became convinced of this when I compared one of these bottles to one that didn't have problems.

The bottle on the left is one of my problem bottles, the one on the right is the first one I cut.  What I want you to look at here is the thickness of each bottle.  I don't have calipers, not sure why, so I can't tell you what the actual thicknesses are in meaningful numbers but I think it's pretty obvious that the bottle on the right is at least twice as thick as the bottle on the left.  I've read that the thickness issue is part of why beer bottles can be a challenge to cut nicely. When the glass is thin any of the flaws it might have will make a bigger impact.  I'm going to have to learn to judge bottle thickness so I can cut down on this sort of problem.

With my cut bottles ready to go I broke out the new cutting board and the carbide powder that came with my bottle cutting kit.  What you do is put a bit of the carbide down, add a little water, and then rub the cut edge around in the resulting mess.  It is as easy as it sounds, but there is one thing you really ought to know about.  Polishing the cut edge makes an ungodly amount of noise.  The hollow space inside the bottle and under my cutting board make echos like you would not believe.  My cats were severely displeased and I can't honestly say I blame them.  It was loud and it was annoying.  More so if the cut part wasn't reasonably even but I'll get to that in a bit.


This is what the polishing setup looked like.  All I had to do was rub the bottle around in circles on the wet carbide and the abrasiveness of the carbide would even out any rough spots.  I was surprised at how well it worked, I just didn't enjoy the noise it made.  The edges felt smooth to the touch after a very short time, maybe a minute or two.  It was nice that it didn't take very long.


This is the base of my first bottle after I had given it a once over on the carbide.  When I was working it I would periodically, and very carefully, run a finger over the broken part to see if it was still pointy or sharp. I stopped when the edge felt smooth to the touch which only took a minute or two.  What I want you to look at here is the edge of the bottle, I've made it large to make it easier to see.  Around the edge you will see sections that look matte and are almost grey in color as well as sections that look so dark as to be almost black.  The dark sections are actually shiny but my camera wouldn't pick that up.  The matte section are where the carbide did it's work and the shiny parts are areas that didn't get polished because of very subtle differences in depth.  I wasn't able to see this difference until I got the carbide cleaned off.  If what you're making isn't going to touch skin, like if it's the bottom edge of something that touches the ground, the level of polish probably won't matter so long as the edge sits flat and isn't sharp.  For something that was to be a drinking glass, for instance, I would take it back to the board and polish until the entire cut edge has the matte look.  The last thing you want is something that could accidentally injure a family member or guest.

Another thing you're going to want to be aware of is that carbide is really abrasive.  I have a ceramic sink which scratches easily enough with regular dishes, so when the time came to wash the carbide off the bottles I used an old kitty litter tub as a wash basin and a paper towel as a wash cloth.  When I was done I poured the used water into the section of my garden where I empty craft buckets.  Even if you don't have a ceramic sink you may want to take that precaution, unless you've got a utility tub or something.  Carbide probably isn't the friend of your garbage disposal either so I would recommend against washing carbide off in your kitchen sink just to be safe.

I don't know about you, but I was wondering how well the carbide method worked on the really uneven pieces.  I grabbed the fail bottle with the uneven edge and gave it a try.  I discovered very quickly that the noise on uneven edges is far worse than the more even edges.  Another point of interest is the shape that it created in the carbide.


You'll notice that there are a lot of gouged looking swirly areas in the carbide.  That's what happens when the edge isn't even.  If you're working on an even piece the carbide makes an even layer with very regular swirls.  I think that will make a handy trick for knowing when you're close  being done with polishing.


Working the uneven edge makes it very obvious which spots are being worked on.  I tried to balance the bottle so that I wouldn't wear down the other side of the bottle while working on the wavy edge.  I learned that the bottle will try to skip about every time the pressure changes on the uneven bits and every time it skips it makes a noise rather like fingernails on a chalkboard.  ::Cringe::

I had a hard time getting the camera to focus on the bits that I was trying to wear down.  I don't think it liked the carbide "fuzziness." I took that picture after about 10 minutes of polishing.  The edge still isn't even but it is a vast improvement.  The only unfortunate bit is how long it takes; swirling the bottle about for that long gets rather boring.  The important part is that it can be done with a bit of patience.  The alternative is to slice of a bit more of the bottle which I shall try on another occasion.  I'm just pleased to have more than one option when it comes to bottles that try to oops.


Review of Ephrem's Bottle Cutter
I've decided to start reviewing new things that I come across.  A bunch of reviews are from websites like Amazon which are usually pretty good, but you can't always tell which posts are plants by the vendor.  Sometimes the reviews are just ranting by an extremely frustrated person, but even then you have no way of knowing how they actually used whatever it was.  To that end, I hope to be as informative as possible by giving you a crafter's perspective.  Please keep in mind that I am a complete novice when it comes to anything glass crafting.  Until I got this cutter I had exactly zero experience with bottle cutting.

Pros:  I have to say that I was very impressed with the bottle cutter.  It works exactly as advertised.  As with any new craft, it does take a bit of practice to familiarize yourself with the process but once you get it down it is really, really easy.  I had absolutely no problems with the cutter itself.  Any issues with uneven breaks seem to have been the bottle having a problem rather than the process being faulty.  The process worked just fine.  I had little to no issue with sooty bottles once I got steadier holding the bottle.  I washed the bottles at the start and the end of the entire process only, so all the pics that you see of the break lines are how they looked with no touching up.  Polishing the bottles takes time, but I don't feel like it takes an unreasonable amount of time.

Cons: If I could change one thing about the cutter it would be to make it a little bit more adjustable so that it could work more easily with smaller bottles, but I'm not certain how that could be accomplished.  I think the reason you can only move the rollers lengthwise is that it would be really unstable if you could also move them widthwise, though roller adapters, like the curve adapter, might work.  Hard to say though, too many moving parts usually spells disaster for simple tools like this.  Another potential con is the noise that the polishing makes.  It's loud!  I probably should have expected that, it makes sense that it would make a fair bit of noise.  Still, I'm considering getting ear plugs because I'm not going to stop smoothing edges.

Notes:  Be patient and be prepared to do a lot of practice scoring.  You might get it figured out in a try or two, but then again, you might not.  I found having a practice bottle to use just for scoring to be helpful.  Don't rush the heat shock portion, it will ultimately make the process take longer.  If you're like me and want things done now! you might want to use a timer for the heating part.  I found it took between one and two minutes to heat the glass completely and evenly enough for it to break.  That will change with the thickness of the bottle, so you will have to experiment to see what works best  for you.  An absorbent cloth under the bottle to catch the melting ice drips is also handy to have around, unless you like puddles on your work surface.

Love It or Leave It:  Love it!  I would absolutely recommend this to anyone who wanted to cut bottles for general crafting purposes. 


Friday, March 2, 2012

DIY Glow Bottles, Science, and Blacklights

I've started testing out some of my first, and simplest, projects; the glow bottle.  This project is NOT the same as all the DIY glow jars that you can find online.  Most of the glow jar type stuff that I've seen has you break open glow sticks to get the glow juice out of them.  They look very impressive, but those reactions don't last forever.  They have the advantage of glowing on their own for a bit, which I'm sure is nice, but what I'm going to show you is completely reusable (a necessity if you build on your decoration collections every year) because it doesn't use a glowing chemical.  Unfortunately, I don't get to take credit for the idea on this one.  Credit for this goes to my high school chem teacher.  I don't know if it was her idea originally, but she's the one I heard it from.  I'm just glad I haven't forgotten about it; I took that class over 10 years ago.  Paying attention pays off!  Anywho, one day in HS chem we were talking about electrons and energy states. When we came into class there were several bottles full of colored liquid on her desk.  Turns out the bottles were to be a visual aid.  There was a black light behind them and turning it on caused the liquid in the bottles to fluoresce.  The glowing happens because the UV light changes the energy state of the dye.  Needless to say, we were all quite impressed.  Then she told us how to make those bottles.  It's really very simple.  The color comes from highlighters and is cunningly extracted with water.

DIY Glow Bottles

Sorry it's a little blurry.  I had to use a longer exposure time to be able to photograph in the mostly dark and I had to hold the bottle nearer the light for a better image.

This is not a project that you should allow kids to do unsupervised.  Between the hammer, ink, glass, and any metal on the bottle that might need removing there are a lot of opportunities to get hurt or make a huge mess or both.  Plus there's the alcohol to consider.  Make sure you take appropriate precautions to prevent damage to your child,  yourself, and/or your stuff.

You will need:
1 clear glass bottle that is water-tight. Screw cap wine bottles work well, as do fish sauce bottles, and probably many other kinds as well.
1 highlighter
plastic bag (to be used as a drop cloth)
gloves (optional)
a hammer
warm water
1 shot of high proof, clear alcohol or rubbing alcohol

A quick note about the highlighter.  You can, of course, use any kind that you want.  However, yellow, orange, and pink typically give the best results.  Blues and greens don't generally work as well.  I'm guessing it's a wavelength issue, but I was never super great at physics.  The colors that we see are the colors that are reflected by an object but if the light in a room is close to the same color as the object they are harder to tell apart.  Also, you'll need to make sure that you don't get the kind of highlighter that has loose, liquid ink that you can see in it.  I'm sure they would work but I'm also pretty sure that a lot would be lost when you crack the thing open.  The orange bottle I made used a fat chisel tip highlighter that said only "highlighter" on its side.  The green highlighter was a Bic brite liner and I must say I was very impressed with how quickly it gave up its ink.  You can see the ink seepage on any of them, but with that green brite liner I could actually watch the white inkless region grow.  It was very entertaining.

You'll want to clean up your bottle before you use it.  Rinse out the previous contents thoroughly.  Fill the bottle with water and cap.  Then submerge the bottle in a container full of hot tap water; I used my sink.  Let the bottle soak until the water has cooled enough for you to put your hands in it and start scraping the labels off.  Focus on getting the paper off first, the adhesive comes off pretty easily by rubbing it with a washcloth.  Don't use steel wool, green Scott's pads, or anything else metal or abrasive because they can scratch your bottle.  Drain and dry your bottle.

My bottle had a metal band on it that I didn't want.  I used a needle nosed pliers to grab and gently pull the metal off the neck of the bottle.  Be careful, you could break the bottle or cut yourself on the metal.
Next you need to get the ink felt out of your highlighter.  I tried breaking the plastic with pliers, which ended poorly.  It was just a little pinch, but it did draw blood and that was with me being careful.  Since the pliers didn't work I switched to the next most dangerous...I mean logical...step. I got a hammer.  I then took my highlighter to the garage (didn't want to risk damaging the floor tile in my house) and gently tapped it with the hammer.  It really didn't take much to get it to crack open, it felt like I was just lightly bouncing the hammer off the highlighter.  Once you have the casing on the highlighter cracked open, you can take out the ink felt.  Be careful not to drop or squeeze the felt tube or it will goo all over and I'm fairly certain highlighter ink stains.  I didn't get ink on my hands, but had I gotten over-enthusiastic with the smashing I probably would have.  I used my gloves anyway because I wasn't sure what the felt was going to do. Use your judgement; if you think it's going to be messy, cover your hands with a baggie or gloves.

Attempt number one did nothing but hurt my hand

This is why you should always be careful and then some.  Even being careful doesn't always save you.  My pliers bit me.  It's a tiny ouchie, but an ouchie none the less.  


The hammer did a much better job.   In case you're wondering, I brought the pen back to the table after smashing it on my cement garage floor.  I did not smash the pen on the table.

Fill the bottle most of the way with warm water then add a little bit of alcohol as a preservative.  Then drop in your ink felt.  The ink felt will immediately start leeching into the water.  Simply let it sit until the water is fully colored.  It doesn't make a huge difference to the end product, but if you leave the ink felt alone and don't shake the bottle you will get all the ink out.  If you shake the bottle, your ink felt will have a tint to it (it's a concentration/osmosis thing.  I could explain it but I suspect most people don't really care).  Again, it isn't a critical issue, but I prefer having a 'clean' felt to remove.  Since the ink felt floats you can take it out once all the color is extracted.  The other thing to do is to fill the bottle up as full as possible.  This removes air space and that plus the alcohol should keep your glow bottle from growing anything unpleasant.  I made the orange one in February so that I have time to watch for icky things growing and warn you about them (it's been a month and no icky yet!).  I'll update the post should it grow anything.


Ink felt.  All you have to do is pull it out.  The way highlighters are made the nib sticks into the felt, they aren't actually attached.

In the bottle

Add water then alcohol
And soak.  I sat and stared at it for a while; it was neat to watch the ink drop out.  You could probably use it to explain about currents, osmosis, and density; the ink drops to the bottom of the bottle and won't go above the end of the ink felt unless you shake the bottle.


This is after about 24 hours of
 soaking the ink felt and giving the bottle a quick shake.  You can then take the felt out (so you don't have it in the final  product) and fill the bottle completely.

And this is what the ink felt looked like afterward.  The reason it isn't pure white is because I shook the bottle too soon.  If I had left it alone I would have gotten all the ink out.

To display, put your bottle(s) near a black light and enjoy!


OK, so I know this pic doesn't look amazingly fantastic but it is really hard to get good pics with my camera in blacklight.  I took this one in my bathroom because it was the only room without windows so I could darken the room.  I only used one blacklight and I put it into the fixture in the bathroom.  This shot was a 'set it down and see how it does' shot which is why the bottle doesn't look as good as it does in the first pic on this post.  The closer to the light, the better your glow will be.


Just for reference, I use Ecobulb blacklight CFLs which are 60 watt replacements.  I'm sure other companies make CFL black lights too but those were the ones I was able to find.  They don't seem to be stocked at normal stores; I got mine at a hardware store.  You can also buy fluorescent tubes and fixtures or incandescent blacklights but I've tried to avoid that so far and I'll tell you why.  First, I can buy 3 or 4 CFL blacklights for the cost of one tube+fixture.  I get a lot more mobility out of the lights that way without having to keep buying more lights.  Second, CFLs fit in standard house hold light fixtures so you don't have to fuss with them.  Third, unlike the incandescent blacklights I've had in the past, the CFLs can actually light a room.  Standard incandescent blacklights are only 25 watts which means not only are they dim, you need a whole lot more of them.  Incandescents are a lot cheaper, but the CFLs have been more than worth the extra so far.

Here's my green bottle.  In this shot it's only been about 5 minutes since the ink felt went in and already you can see the white showing up on the end.

In the same amount of time this is how much ink had already leached out.

This pic was taken maybe 10 minutes in.

And then maybe another 5 minutes later.  The ink felt is already over an inch white at this stage.  You'll notice that there is ink above the bottom of the ink felt which doesn't typically happen.  It turns out there was a seam on the ink felt and it started leaking from there too.
UPDATE:  I have more colors now!  The pink (on the right) is a little anemic, I'll be adding more ink felt to it to see if I can't beef it up a bit.


That's pretty much it as far as making the bottles are concerned.  Now, if you'll bear with me, I'm going to take you backwards for a minute.  When I was going on about how to get the best color results from your highlighters it occurred to me to try an experiment.  You'll remember that I told you that blue and green highlighters don't work as well as pinks, oranges, and yellows.  Well, I started thinking about that as I was writing up my post.  Hang on to your hats, we're about to get geeky!

The Science of Light and Color
There's a bit of science that needs addressing because my thoughts won't make sense otherwise.  Those of you who remember about the visible spectrum and wavelengths, or just want to see how the story ends, can just skip over this bit.  The visible spectrum is the rainbow colors of ROYGBIV except that scientists like to call blue "cyan" because we call indigo "blue".  We're special like that.  Red has the longest wavelength which makes it the slowest and violet has the smallest and is the fastest.  Next to red is infrared which has a longer, slower wavelength but can't be seen by people. This is what infrared (or IR) cameras use to record in complete darkness.  Watch a ghost hunting show, they use IR cameras in the dark because they don't need the same light we do to see by.  On the other end is faster light with a smaller wavelength.  It's ultraviolet (UV) light which we also can't see but is emitted by blacklights.  Blacklights do give off a purple light but that isn't the actual UV.  The purple/blue we see from black light is where violet light overlaps the UV light.  We can only see the effect of the UV; making things glow, or 'fluoresce' as scientists call it.  Like I mentioned earlier, there is some overlap in colors.  Blue overlaps with violet a little bit just like violet overlaps a little bit with ultraviolet and so on.  That will be important in a little bit.  The colors we see are the result of the light color that is reflected off an object.  If you see something green that means that object is soaking up all the other colors but bouncing the green back at you.  Now, for the orange bottle to glow, it soaks up all the colors besides the orange and bounces the orange off for us to see.  The orange doesn't blend in with the violet we see in the room because it has a very different wavelength.  Orange is 5 colors away from UV on the spectrum so there is no overlap.  Blue, on the other hand, has a problem.  If I made a blue bottle it would only bounce the blue color back for us to see but blue is right next to violet on the spectrum.  That means there can be some overlapping between the two.  So if the light around you is blue/violet and the object is bouncing blue/violet back at you the object is going to be harder, if not impossible, to see.

And now we get to why I gave you a mini science lecture.  The blue highlighters do tend to have deeper colors on paper and on paper it looks very similar to the light that black lights give off.  Given that information, it makes sense that there would be a wavelength issue for blues (hard to see = doesn't glow well).  But what about the green?  After all, the greens look as bright on paper as the other colors do and I know I've had neon green stuff light up under UV light before.  Plus green is farther down on the spectrum, not by a lot, but it's past blue so there shouldn't be wavelength issues.  Then I had an idea.  What if the green only shows up in neon when it has a white background?  If that's the case, all I should have to do is make the bottle cloudy to get the green to show up better.  This is where my time surfing the interwebs for ideas comes in really handy.  It just so happens that something called "clouding agents" exist.  You know how some Kool-Aid isn't see through and always has that white stuff in the bottle of pitcher?  That's a clouding agent.  There is also a clouding agent, known as liquid whitener, which is used to make lollipops opaque.  Guess what I went hunting for?

It was a lot harder to find that I thought it would be.  Impossible is probably a better word.  It seems that craft stores are better prepared for people who want to make suckers out of chocolate rather than sugar.  So, instead of waiting on an internet order, I picked up what I hoped was the next best thing.  White-white icing color.  There were only two types to choose from so I picked the one made by Wilton.  Not because it was a Wilton product, but because it only has three ingredients.  The other one had stuff like citric acid and lots of preservatives in it but the Wilton one only had titanium dioxide, glycerin, and water.  None of those things go bad easily and none of them are commonly used by bacteria for survival.  Bacteria can live on citric acid and a number of the other things in the other dye and that's why I avoided it.  Armed with my new find, I set about my experimental design.

I decided to test two things.  First, how well the whitener works and second, if my hall bath had enough UV to make the bottles look good.  I had wanted to test the lighting anyway, so I figured I could do two experiments at once and save some time.

Starting with the whitener, I had to make sure the liquid whitener doesn't clump up in water even after alcohol has been added.  Since there is no standard way to cloud glow bottles, unless I invent one I suppose, I also had to figure out how much to use.  I grabbed a little glass jar with lid (so I could shake to mix) and put a bit of water and alcohol in it.  It looked to be about 6 ounces of fluids.  Then I put three drops of white-white icing color in. They sank to the bottom almost immediately, glycerin is more dense than water, and looked neat enough to give me another craft idea but that's for another day.  Then I closed up my jar and gave it a good shake.  I set a timer and let it sit for 5 minutes and then 10 more minutes to see if the white settled out quickly or not.  Then I let it sit for most of the rest of the day for the same reason.  It sat for about 8 hours total.

Food color drips into the water.  Looks pretty neat.

After a quick shake the whole thing was solid white.

2 hours later you can see a heavy line developing on the bottom.

4 hours in and not only is there a white line on the bottom but you can also see a small clear section at the top

6 hours after shaking and it's pretty clear the color won't stay in solution.

After 8 hours all the dye has pretty much fallen out of solution.  That's glycerin for you )-:


For the main test I thought about making two bottles of green, but that seemed a little wasteful.  Instead I used just one bottle of green and later added the whitener.

On to the lighting test.  Since I plan on using more than one black light, I decided to check how well my bottles work in their display site.  So I needed to replace all the normal lights with blacklight CFLs in the bathroom where the bottles will be displayed.  My hall bath has 3 lights so I grabbed 3 blacklights and went to work.  One of the fun parts is having to keep the lights I'm taking out off so they don't get too hot to touch.  This is where the hall lights and my Scentsy plug-in come in really handy.  They give just enough light for me to be able to switch everything out.  I set up in the evening because I didn't want to leave the bulbs in all day, so that little bit of extra light was necessary.  I could have put the lights in earlier, but I chose not to since I would have to wait until dark to test the bottles and I didn't want to leave the lights in all day.  I tend to get distracted easily, you see, and would be seriously confused if I tried to use that bathroom and the lights weren't what I was expecting.  Sad but true, I do things like that all the time.

Now, to make sure the test is fair I needed to put the green bottle in as close to the same position as it was before I added whitener.  In the photos you'll see little sticky tabs that I put down everywhere that I shot the bottles.  I did both the green and orange bottles so that I could see what a "good" response was.  And here's what I found!


This is a pre-whitening shot.  I'm not sure the orange bottle is bright enough, even with 3 blacklights in the room.  You can see the light is working on the silk flowers, too!

The tabs I used for marking position were black light responsive.  It's hard to tell from the photo, but the blue and green tabs didn't glow as well as the other 3.

Position number 2 and the green doesn't look any better.

Unfortunately it doesn't look any better after having 6 drops of white-white added to it!

I held it up to the light just to check.  No dice.

No better in position 1

I must admit that the bottle looks better in normal light after the white-white  dye was added.  It may have potential, if not under blacklight.  At least I was right about the white making the green look brighter!

At this point I finally thought to check if the whitening was blacklight responsive.  I'm guessing that was the problem but I have no idea what to do about it.

All the bottles at the end.