Look at me, super posting! Woo! Don't get too used to it, lol. My current goal is one pattern a week plus a Halloween craft/prop post if I've gotten something done. I've got a bunch of projects going, so that should keep us busy for quite a while.
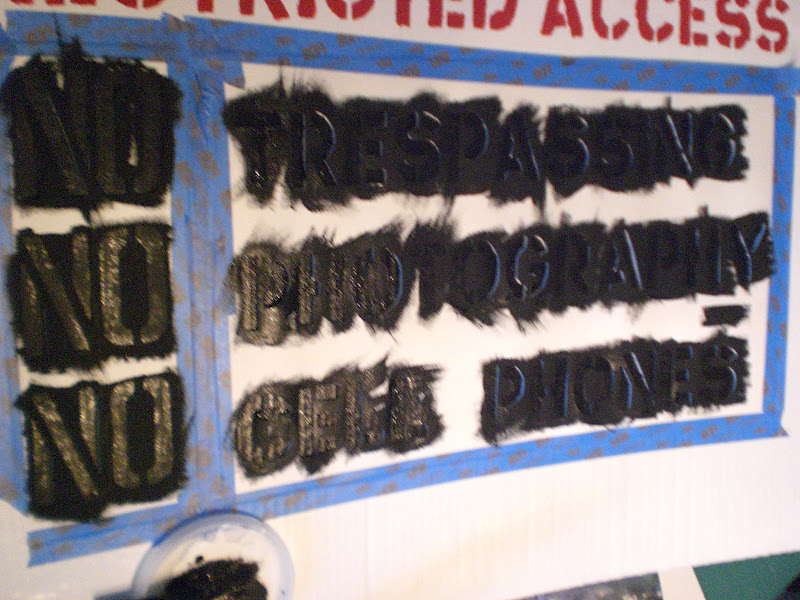
Just FIY, this is a long one. I even cut the post in half and only did one method at a time but it's still long! It is, however, well worth the read if you're wanting something that looks like this:
That may just be my favorite sign. (-:
Sometime back in early March I decided to start working on my Mad Scientist signage. I figured that would give me enough time to get everything made even with the inevitable oops moments and material collection delays. My other goal was to buy as little as possible which is why material collection was so important. The list of purchased bits was nice and short though. I got some paint in red and black, a new X-acto knife, some poster board, and some painters tape. Everything else I had around. I probably didn't even need to get the black and red paint. I got the bounty of old paint that my parents wanted to get rid of and there was some black and red paint cans in that. Ah well, paint is always useful.
The plan was to make a realistic number of signs. It was a bit tricky to stick with that because the signs were really fun to make and there are soooo many options. But, too many signs would just look funny which makes it really important not to go overboard. So, I made a list of signs that I wanted and went from there.
The goals I set for signs were:
- A large sign for the outside of the house that says "restricted access, authorized personnel only" with something about no photography/trespassing/etc.
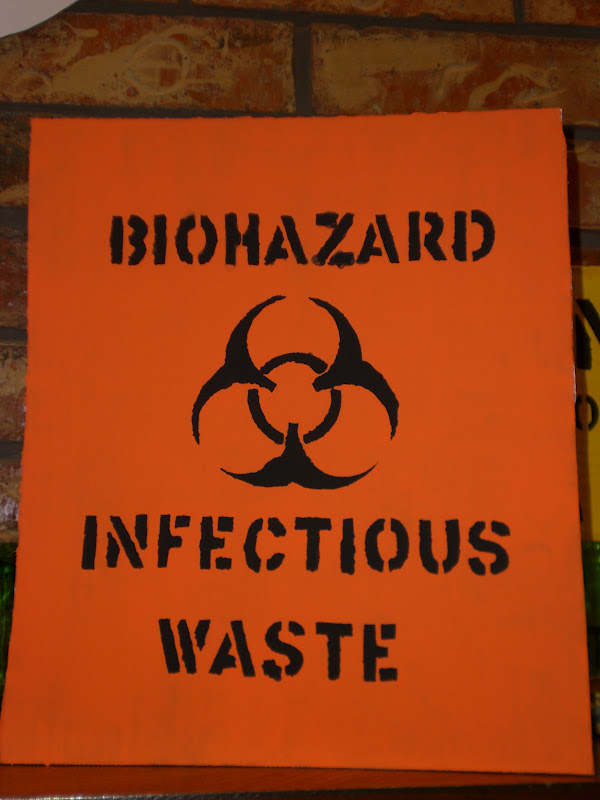
- Signs for the door stating "radioactive material", "biohazard", "infectious agent", and so on. Some of these might go with the larger sign to keep things uncluttered.
- The entry is a little tricky because I eventually want a faux door with "danger: high voltage" on it but I also need a sign or two that have an arrow pointing to the "decontamination center" so I'm really not sure how that's going to work out.
- Signs for the bathroom will include ones about an "emergency safety shower", "biohazard", and "wash hands" as well as one for the door indicating "decontamination center".
- The living room will need general warning signs about hazardous material, radiation, and so on.
- For my dining room, I'll need some more "biohazard"s, as well as a "radiation", "high voltage", and possibly one for "caustic agents"
I'm still not 100% on all of them yet. I've been coming up with them as I go along. I did actually start with some of the simple signs first, but that didn't last long.
My original idea for making them was to do stencil layers with spray paint. Using the safety shower sign as an example, I would paint the base white then put down a stencil with "emergency" solid surrounded by a box for the red (the white shows through for the letters that way) and then a stencil with open letters for "safety shower" that blocked the rest of the sign. It isn't an unreasonable way to make a sign, until I remember how well I work with spray paint. Being wondrously crafty in other ways, it may come as a surprise to you that I am positively dreadful with spray paint. The more I thought about that process the more convinced I became that there would be all manner of over spray, drip lines, and loose stencils. That seems a much more realistic result of paint layers than success.
Interestingly, it isn't the stencil process that would be the problem, it's mostly the spray paint idea. Hand painting seemed to be the best choice. I'm reasonably consistent with painting by hand, especially if I don't have to freehand the letters. I have a nice trick up my sleeve for that one. My mom has a large box of stencils and stencil like things from back when she had a photo shop. Stencils good. The plan was that they should cut down on the slanting up or down and getting smaller than happens with freehand.
Having figured out how to do the paint job I settled in to wait. You'll notice that I haven't yet mentioned the cardboard. That would be why I had to wait. I don't have piles of cardboard just sitting around; my garage would look far worse than it does if I did. Sadly this meant waiting for a big order of something to show up at the lab. Most of what I get at home tends to be DVDs and they don't require a whole lot of packaging. While I was waiting for boxes I rummaged the stencil box and found some vinyl lettering. Vinyl letters are great because they are super easy to use. They're not so great in terms of cost, though. I decided to stencil out some of the larger signs and use vinyl lettering on some of the smaller signs that would have taken an ungodly amount of time otherwise. But, that's for the next post.
Happily, I didn't have to wait as long as I thought I would for boxes. Turns out the lab was up for a cleaning and a nice, flat box that had shipped an easel sized notepad went in the out pile. Score one box! Then I had a Scentsy order come in and I got another box! Boxes, boxes everywhere! Whee!! I have since collected an astonishing number of boxes and now have to figure out a new way to organize my garage. It's getting rather full of crafty bits, but I digress.
I cut the easel box down and brought it in to try out the stencil idea. I laid out the stencils I wanted to use and penciled it on the cardboard. Doing that before painting it made it really easy to see how well things would fit. It also let me practice with the stencils which alerted me to an unforeseen problem. The only way to paint in the letters would be to do one letter, let it dry, do the next letter, let it dry, and so on hoping all the while that the lettering stays even and level. I had very little faith in my ability to manage that so I changed the game plan. Instead of stenciling each letter, why not just make a stencil of the whole bloody sign?
Stencil Sign
**This is NOT a quick and simple project. As you've likely figured out, I don't design my projects with kids in mind. If something works well for use with kids that's all well and good, but it isn't something I specifically aim for and this project is no exception. You can adapt it for kids pretty easily but as is I do not recommend this one for children. If you have youngsters help you I strongly suggest you only let them stencil the letters and not let them cut the letters out unless you have a super safe craft knife or something that you know they can use safely. By all means, show and teach them what you're doing, but X-acto knives are dangerous even if you know what you're doing; there's always the risk of injury with them and kids don't always have the motor skills to reduce that risk. You know your kids' limitations better than I do so be aware and be safe!**
Materials:
cardboard
stencils- you can get these at office supply stores and even some craft stores in all kinds of fonts and sizes
paint- red, black, and white are the most commonly needed but having yellow and blue around is nice because you can mix to almost anything
paint brushes/sponges of various sizes
painters tape
poster board
pencils
X-acto knife
drop cloth for your working area and something you don't mind cutting on (I really like the green self-healing cutting mats that quilters use)
Crafting tip: This kind of project is great for using up bits of leftover paint. Before you start anything like this, you should check your garage and craft supplies for any paint that you might have that could work. You do have to be a bit careful, latex and oil paints are not friends and do not mix. If you don't have leftover paint that will work, there's another trick you can use. Any store that mixes paint to sell will have a rack of paint that didn't turn out right somewhere. The best part is that reject paint is typically marked down quite a bit. It's worth going through it to see if there's anything useful. Light colors are really great. You can pour a bit into a cup and add some craft paint to change the color. That simple trick will stretch your paint over more projects and really helps to keep the crafting budget under control. I love unloved paint!
The first thing you need to do is plan out what you want your sign to say. The sign I'm using as an example is destined to be hung outside my house and I modeled it after the sort of signs you see outside of military installations. I decided I wanted it to say:
RESEARCH FACILITY
RESTRICTED ACCESS
NO TRESPASSING
NO PHOTOGRAPHY
NO SOMETHING ELSE
AUTHORIZED PERSONNEL ONLY
It's also going to have biohazard and radiation warnings hung off it, but one thing at a time.
Now you have what you want your sign to say you have to see if it's going to fit on your cardboard. If you have a big piece like from a refrigerator or other large appliance this probably isn't going to be an issue (but you should double check to be sure). If you're working with what you can find, it very likely will be a problem. Start by lining out your stencils to see how well your wording fits. If you're using the kind of stencil where you get a page with multiple letters just do the best you can to estimate the amount of space you need. You may need to adjust the size of stencil you use or the wording to fit your cardboard. For little signs you'll need to cut the cardboard down but don't do that just yet!

Once you're happy with your wording, lightly trace the stencils on to the cardboard with a pencil. DON'T PUSH HARD and DON'T USE A MARKER!!!! You're going to be painting over the cardboard and any irregularities WILL show up. If you use a marker you'll have to do extra painting to cover it. You'll want to be careful how much of your weight you put on the cardboard, too, since that can put dents in it. Sorry, no pic for this step. The pencil blends in too well with the card board for the camera to pick up.
Use the tracing time to figure out what, if any, adjustments need to be made. If you need to change something, repeat the tracing to make sure it works. When you've got it exactly right you can trim the cardboard to fit the sign if you need to.
Next, take your poster board and make it the same size as your cardboard piece. If it's a big sign you may need to tape poster board pieces together. Use the painters tape to hold the pieces together, that way you aren't stuck with that seam if you need to shift the poster board later. The idea is to fit whole words on a continuous piece of poster board. If a word is split by a seam you may have to adjust the poster board accordingly, in some cases even by using a different piece and seaming it in.
Put your cardboard with the tracings on it somewhere that you can see it easily and use the stencils to trace the wording out on the poster board using the cardboard piece as a guide. If you don't do it this way you'll end up with this:

 |
| The little dots at the bottom are how you line the stencil up |
You can see I had a bit of trouble with the 'restricted access' part of my sign. I started out in pencil, did the first adjustment in black, and the second adjustment in red. It would have saved time if I had been more meticulous but I got ahead of myself and I had already painted the card board which obliterated the one thing that would have helped me. Stupid, stupid, stupid! It's just that I get so excited about getting to paint that I get carried away. I swear I would paint rooms just for the fun of it I like painting that much.
 |
| Well planned tracing works much better! |
 |
| Since I'm doing a lot of signs, there's a lot of card board to paint. |
As soon as your poster board template is traced out you can go ahead and put a layer of paint on your cardboard unless it's really humid out. You need to check that out because cardboard doesn't much care for getting wet as it is. Humidity helps the cardboard to warp out of shape worse than it would with just paint alone. It also makes the paint take forever to dry. If you can't leave the cardboard laying flat for some reason, like if you're making a bunch of signs, and have to lean the cardboard against something (protect your surfaces from the paint!) make sure the corrugations in the cardboard are going up and down, not side to side. The cardboard will warp with the corrugations, not against them, and if you lean it with the corrugations getting pressure it can make the warping a lot worse. You will need more than one layer of paint so keep an eye on how the cardboard is drying as you start working on cutting out your stencil. You can use your breaks from cutting out to put more layers of paint on the cardboard.
 |
| Pretty painted cardboard but you'll notice it's curved up on the sides. That's what happens when the paint dries and contracts. |
Right, so now you have your master stencil template and your cardboard is drying the next step is to start cutting out those letters. Do yourself a favor and make the place where you do this as comfortable as possible. Also, give yourself a ton of time. It took me an hour just to cut out 'research' and another two hours to do 'facility', 'restricted', and 'access' and I was kneeling on the cold, hard cement of my garage floor the whole time. I was smart enough to only cut for an hour before taking a break, but this is the sort of thing that happens when you don't think about things in advance. DO NOT RUSH CUTTING OUT THE LETTERS!! You need to be super careful with the cutting and you may want to consider doing a practice piece before doing your stencil especially if you have lots of curvy letters. Curvy letters are hard. If you have stray cuts they can let paint leak later or worse, cut off bits that you needed and not just from your stencil. X-acto knives are sharp and will cut through flesh with the same ease with which they cut through paper. This is especially true if you do your cutting on a garage floor like I did. Cement has all manner of uneven bits that your knife can catch on which increases the chance of the blade moving in a way you didn't expect. It wasn't my first choice for a cutting surface but I don't have a big enough cutting board for this and I couldn't do it in the house because of my feline assistants. I had also completely forgotten that I inherited a green cutting mat from my grandma's craft supply. Once I remembered that it made stencil cutting go a lot faster. When you are cutting, don't do it for extended periods of time right off. You'll start getting tired long before you think because the cutting out process uses different muscles. You'll make more mistakes if you're tired, too, so make sure you stop work when you start getting tired. After you've gotten the hang of it, the stenciling will go faster and you'll be able to do it for longer.

It took me several days to get this thing fully cut out. It took something like 4 hours to complete, and that was just the cutting. The tracing took close to an hour so that's a grand total of something like 5 hours to make just this stencil. It wasn't even done at this point because I still had another "NO" to add to it and I hadn't even started the "authorized personnel only" bit.

In between bouts of stencil cutting, you can work on your painting. It makes the whole process go a little faster since you can do more than one thing at a time. It only took 2 coats to make a nice white background for my sign so the next step was to put the red section on for the heading. Using painters tape I marked out the size space I needed for the red. That way I could just paint on the thing and not have to worry overmuch about getting paint where I didn't want it.
 |
| After you mark off the section you start painting. I try to only paint in one direction at a time. I like the look of the paint edge, you could use it for a bloody prop if you needed to. (-: |
 |
| Streaky first coat |
 |
| On the second coat of red I used up and down brush strokes which helped to give better coverage. That's why it makes sense to paint in only one direction at a time. |
Once all the background paint layers are dry and your stencil(s) are cut out, you can move on to painting the letters in. Put your stencil on the base to see how everything lines up, just in case something needs changing.
If something's gone wrong, now's your chance to fix it up. If everything looks good, peel off the tape line and continue on.
At this point I trimmed my stencil down. I had done another bit of stenciling already and discovered that the poster board warps as it soaks up paint. If the stencil was kept whole and it was painted all at the same time, the later sections won't lay flat and you have the opportunity for your stencil to fail. I kept the first two lines together and the "NO" section together because I needed the spacing to be precise.
Use the painters tape again to secure the stencil in place. Make sure you get it absolutely flat.
Then the best part, painting! Resist the urge to make proper brush strokes or anything else that might make a smearing motion. You need to do something called stippling which is where you poke the surface with the brush. Keep the motion strictly up and down at all times. If you poke the paint at the board in an up/down motion the brush will press the stencil down and into place each time and it keeps the paint from bleeding outside the lines. The other trick is to stipple with an almost dry brush. It will leave a texture where the letters are but if you put too much paint on the brush you risk the paint bleeding. DO NOT REMOVE THE STENCIL! You will hate yourself if you do because you may have to put more paint down and getting the stencil back exactly where it was will not be easy.
 |
| Hold your brush vertically when you stipple. |
 |
| This is how the stippling should look. You can change the direction of the brush so that it runs either parallel to the letters or at angles to the letters. Just resist the urge to make brushing strokes. |
 |
| Painted in |
If you need to go back and put another layer of paint down you may have to hold the stencil in place by hand to keep the warps from causing a problem. The craft paint doesn't seem to be the culprit for warping, that goes to the interior paint. Once the craft paint dries the poster board would lay flat again but the part that got white paint, the interior latex, stayed warped. If you have to hold down parts of the stencil be sure to have a towel or something to wipe your hands with. You will get paint on yourself and you need to be really careful that you don't touch any unprotected section, unless you want painted fingerprints on everything. The red needed three coats, the white took two. The white also looked better when dry. There were more visible bubbly texture marks in the red. I'm guessing that would be the difference between craft paint and interior paint. When, and only when, you are completely happy with how your paint job looks you can take the stencil off. Do this gently, the paint may have glued the stencil to the cardboard in places. If that has happened you'll have to pick little bits of poster board out of the paint. Amazingly, it doesn't make the sign look bad. Not sure why, but I'm also not sure I care so long as it looks good!

One of the problems you can encounter is a bubbly template. I'm not sure bubbly is the best term, but it made the most sense to me. Anyway, the important bit is that not all the template lays flat on the base. It causes very big problems for such a simple thing. If the template doesn't stay flush on the base you can end up with paint smears where you don't want them. The template also may not hit the same place each time you push down on it which will compromise your letters.

The solution to this is to tape the edges of the template and then cutting out some of the "empty" space. Taping the ends down before you cut makes it easier to keep the lettering lined up. Then you tape all the edges down and it helps hold things in place for painting. One thing that is absolutely critical is making sure you get all the spaces around the cut edges taped off. You will miss at some point so if you don't have those spaces covered expect to get unwanted paint on them. The other thing to watch out for it too much paint on your brush. In the pic you'll see a smudge over the "S" in "phones". That's the easiest and fastest way to get excess paint off your brush, just wipe it off on the template but be careful that you don't stick your hands in it. Excess paint can be a great way to get painty fingerprints all over your sign.
 |
| "authorized personnel only" didn't fit )-: |
Just for giggles, here are some of the other templates and signs that I've made using this technique. I'll add to this as I make more. There may not be a completed sign for each template, but there will be eventually. The plan is to use the templates as place holders so that I don't forget to add the sign later.
There is one sign that I'm especially proud of. It took a bit more work because it had more elements to it. The end result will be in Part 2 (there's a Part 2 for lab signs because there's another method), you'll see why when you get there. This is the starting of my decontamination sign for the bathroom door.
 |
| Outlining stencil |
This stencil took me a really long time to work out. Not because it was hard but because I was trying to be really precise. I used a compass to get the circles and then I did a lot work with a straight edge. If you enlarge the pic you'll see some of my sketch lines. I made the outer circle first, then quartered it to start the square. To make the square I measured the same distance out from the center point on each line and used a very well marked straight edge to make sure the subsequent lines were at 90 degrees to each other and did some more measuring and marking to make the thick boarder you see cut out. Then I used the compass again to mark the inner cut circle edges. The little connecting lines you see were added sketched in so that the stencil would stay in one piece. Then I cut out all the edging sections with the x-acto knife (did that freehand, no less). It took a while to make it work but it looks good.
In order to save myself the trouble of making a second overlapping stencil to let me paint the squares in, I overlaid the stencil onto the prepared bit of cardboard (it started out square but I used the compass and the x-acto on it to make it round) and traced the edges. Then all I had to do was tape around the lines and fill in the squares. Marking center is important at this point. The pencil lines won't show so long as they get covered in enough paint. It works better with darker colors than light colors.
 |
| Center point |
 |
| Taped edges |
 |
| Taped squares |
 |
| Filling in |

A couple of important notes. The top "small" square that you see in the taped squares pic isn't really. It was taped that way to protect the space between colored squares. Taping it the way I did made it so that I could have 2 colors going at once. You'll notice that the bottom square stays completely taped over for this part. That's to protect it because it's supposed to be white. You can see on the filling in pic where a drop of blue paint dripped and was wiped off. I corrected it later but I didn't want to have to chance painting over color for the white square. Even with my taping precautions some of the color bled a bit. That was even with me rubbing it down really well to seal the edges. Happily, it was the yellow that made the biggest mess and it's the easiest to cover up so no worries there. This is also why you do the colored parts first. When it's outlining time the black lines will cover any blemishes in the color square edges.
Now, there was the one problem that the paint bled farther than was going to be painted black. Instead of trying to cover everything up with white I tried a little experiment. The paint I was using was latex acrylic gloss enamel and it said on the can that it has soap and water clean up. So, I grabbed a paper towel, got it damp, and tried gently rubbing the paint off. You can imagine my surprise when it worked. It wasn't a complete removal, there was a bit of blue staining where the excess had been, but I think I got damn lucky that it came off at all.
With the clean up done, I positioned the stencil and went to work, using as little paint as possible to keep the edges from going funny. It almost worked.
Then all I had to do was a little touch up by hand with a very, very small brush. There were also some gaps between the painted squares and the outlining that needed filling in.
Coming soon...DIY Mad Scientist Lab Signs: Part 2