Pages

Sunday, July 29, 2012

The Door: Part 3

Now that the hard parts are done with I can move forward with making my fancy door.  Using my diagram I transferred the piece onto some gridded poster board.  Gridded poster board is awesome for all the same reasons graph paper is.  The pre-measured, consistently sized squares make it really easy to get the proper angles on the stencil.  You can do it with normal poster board and a ruler but I don't recommend it.  Drafting tools would work, but they're harder to use with little to no experience than you would think.  Stick with the gridded poster board.

I had hoped to have some pics of the process for you, but unfortunately my camera couldn't pick up the grid on the poster board nor did it want to pick up either the stencil making process or the stencil tracing process so you're going to have to use your imagination for those bits.

Transferring the pieces was really easy.  The poster board was marked in half inch squares and my scale on the graph paper was 3 inches to a square.  That translates to 1 graph paper square equals 6 poster board squares.  Pretty easy, really.  It's mostly just a bunch of counting.  Granted, that doesn't mean you won't mess up at some point.  I managed to do that very quickly.  Happily, I caught it before I started cutting anything.  Remember, you only need one stencil per piece so your layout isn't going to look like your foam board cutting layout.  You can make a layout for the stencils if you want, but it's a little easier to eyeball.  If you use pencil and mark the points of each piece it makes it a lot easier to shift things about so you can cram as much as possible on the poster board sheet.  Once you have the pieces roughly marked out, you can use a straight edge to draw in the lines.  Then double check your measurements on every piece.  It's really easy to make a mistake so extra checking is a good idea.  If something doesn't look right, it probably isn't, so measure it out again.

If your luck runs like mine, you're probably going to notice a small problem at some point.  You see, the standard size for foam board is 20x30 but the standard "full size" poster board is 22x28...because they hate me.  I swear the crafting world is as bad as science when it comes to "standard" numbers.  There's one type of sample that routinely infuriates me at work because of "standard" numbers.  To process a certain type of sample it has to go through 5 different types of kit and NONE of the numbers match.  The first kit comes with enough material to do 50 samples, you can't get less, but the second kit will only do 20 samples and then only if you do them all at once (they short you on one component so to get full use out of the kit you have to use the whole thing in one go) and one step requires that you put the samples in a magnetic stand which come in strips of 6 (20 isn't divisible by 6 so you have to have 4 stands).  Then I have to check and make sure the samples are good and that happens in groups of 12.  All that before I use the kit that lets you put in on arrays, which does 24 samples, but requires a centrifuge step and my two centrifuges hold 18 and 30 samples, respectively.  The you have to put them on the arrays, which happens in groups of 6, 8, or 12 but you have to buy a minimum of 12, 16, or 24 because they don't come in 1 packs.  And people wonder why I'm so good with organizing stuff.  The lab would be chaos, otherwise.  So, much like I do at work, you have to tweak things to fit your needs.

I have 2 stencils that have to be larger than 28 inches which obviously is not going to fit on 1 piece of poster board.  That means I have to split my stencils.  It's actually really easy to do on the gridded poster board.  First, decide an easy spot to split the stencil.  Then mark out all the pieces but leave an extra half inch on any side that has to connect to another piece.  Once you get your pieces cut out just overlap the half inch tabs, tape it all together, and you've got a full sized stencil.

Lay out

Position

Tape


To transfer the stencil outline to the foam board, hold the stencil securely as you trace them one at a time.  You can try using a bit of tape to hold the stencil down but I found that the tape made it harder to get the stencil positioned..  Once you get all your pieces traced out, COUNT THEM ALL AGAIN!  After you've made sure you traced out the correct number of pieces you can start cutting them out.  I used an Xacto knife to cut out my pieces.  Whatever method you use, just be careful.  Xacto knife cuts hurt a lot more than you think they would.  Happily, the one that got me the other day was nice and sharp so it healed up in no time, you can barely see the scar, but it still hurt! 


You need to be a little careful with the cutting out process.  Sometimes the foam core catches and doesn't cut smoothly.  It can cause your cutting tool to bind or deflect off in an unwanted direction so take it nice and slow.  If your cutting blade catches and you manage to prevent it from slicing the wrong way it can still cause unsightly dents in your cut edges, as shown below.


Once you get your piece cut out you can move on to the fun part, painting!  I'm not going to focus on the door base for this part, it's all uninterestingly one color so there isn't much to show there.  Instead I'm focusing on the frame because it has a lot more detail and so should be more informative.

Spray paint makes painting a lot easier; it will give you a smoother coat than a brush will and it dries a lot faster than other paints.  By painting all the pieces before they're assembled it ensures that I don't get paint where it doesn't belong.  Just make sure you have room for everything to dry.  If you stack your pieces before the paint has dried completely they can stick together and mess up your paint job.  The spray paint can will tell you how long the dry time should be.  Plan on a couple days for this part.  I always need multiple coats to make spray paint look nice and I try to do things in color groups so that there is no trouble with over-spray.  It may be necessary to paint the foam board on both sides because it can warp when it gets wet.  1/2 inch foam core is a little harder to bend so it's less of a problem but 3/16 inch foam board likes to warp but painting both sides seems to help undo the warping.

A piece of door frame with the yellow base applied
If you're using multiple colors on any of your pieces always work from lightest to darkest.  It's much easier to get a good color if you aren't trying to paint a light color over a dark one and it uses less paint.  You will need to cover over any of the lighter paint in areas where it needs to show through.  For the stripes on my frame I painted the yellow base first (the instructions for that paint actually say to paint it over a white base for best effect).  Once I was certain the paint was completely dry (if it's wet at all the painters tape can peel the paint up) I marked out where the stripes should go and used painters tape to block off the yellow stripes.  Then I was able to put the black paint on.  When it was completely dry, peeling the tape off revealed my pretty yellow stripes.


Using a straightedge to put down the painters tape

A completely taped piece
After painting the black layer and the painters tape removed


I had to use my colored diagram to make sure that the color alternation continued beyond each seam

One side of the door frame

These are the paints I used for the door frame.  I stumbled upon the Krylon Fluorescent completely by accident but it happened to be exactly what I needed to make the door look right.

Sunday, July 15, 2012

It Was All Yellow

We've already established that I'm not always the best about getting posts up.  Sometimes for good reasons, sometimes for lazy reasons.  Well, today I have a good reason and, for once, it's something I can actually show you.  I've not been getting much of anything fun done this week because I've been working on getting my hall bath repainted.  Why?  Well, remember this?


 If you do, then you probably remember this as well. (If you don't, it's in Creepy Creeps with Eerie Eyes)


That's right, the giant mess I made peeling my wall clings off.  It really has taken me this long to do something about it.  Again with the lazy.  Unfortunately, I wasn't able to go with my original plan of using leftover paint to patch the sanded and primed spots.  A 6 year old can of paint tends to have a bit of rust in it and this one had enough that I couldn't use it.  No problem, I thought.  I'll just go get a new can and have them color match it (I couldn't find the original paint chip.  I'm sure it's around somewhere because I kept all the paint chips I used for precisely this reason).  Yeah, the problem with 6 year old paint is that in 6 years a lot of things change.  Not only has the paint changed, but the brand that the color originally came from isn't even carried at Lowe's anymore.  I couldn't get a new paint chip, I couldn't be sure that anything I got would match, and the paint brand that I had used was now a paint+primer that cost the earth.  So, I grabbed some Killz paint (any paint I used had to be good against mildew, that bathroom does not vent well and moisture collects enough to literally drip down the walls.  I've watched it happen, it's kinda disturbing) and had the paint lady do the best she could color matching from the paint can.  I got it home and hit a few spots and I must say the color was pretty dang close...it was the paint that wasn't.  Guess who grabbed primer thinking it was paint?  Go, me.  Supremely frustrated at this point I decided that if I was going to have to repaint the whole damn bathroom I at least was going to do it in a new color.  I gathered up some new paint chips, picked a color, and went to town.  3 coats of paint later, covering blue was more of a pain than I anticipated even with a slightly darker color, I have a repaired bathroom.  In my grand tradition, it's nice and bright.  Brighter than I was expecting, truth be told, but I really like it.  Especially with the contrast with the blue cabinetry.  I'm really, really pleased with my happy new paint.  Introducing my newly improved  "Iced Pineapple" bathroom!


Great, isn't it?  And it will stay this way, I've learned my lesson about home made wall clings!  With that out of the way I might even have time to do a fun post soon.  Now that I don't have to feel guilty about having an unfinished bathroom I can get back to creating things.

Sunday, July 8, 2012

The Door: Part 2

Today we're going to talk about diagrams.  Sounds boring, I know, but I cannot stress enough how important this step is.  I could just tell you how my diagram and all it's measurements turned out but I'm afraid that people won't go past it and customize their own door.  Anyone who has diagrammed things out knows that it isn't terribly hard, it really isn't.  It sounds a lot more intimidating than it really is.  That's probably why so many people I talk to look at me like I have 6 heads when I talk about diagramming things out and then start telling me how smart I am which is just silly.  Anyone can make a good diagram with a little practice.  If you have no experience with a thing, of course it seems scary and anyone who can do this strange and wondrous thing must have some extra edge.  Lies and propaganda, that is.  Don't sell yourself short, you'd be surprised what you can pull of if you give it a shot.  What it comes down to are skill sets, not intelligence, and you can't be good at something if you never try.  Hence me taking you through the steps to make a diagram.  Good diagrams will make your life sooo much easier, and not just for props.  You can use them to lay out rooms without having to move your furniture (or appliances, if you're doing a kitchen) a gazillion times or use them to organize closets or design a planting plan for a garden.  Diagrams are indispensable and it all comes down to one thing.  Graph paper.

I adore graph paper and you should too.  Sure, you could try to sketch out a grid on your own but unless you have a bunch of time and some seriously awesome drafting tools it isn't worth it.  The grid is the most important part.  All those evenly spaced lines are what let you make to-scale diagrams and I LOVE making to-scale diagrams! Yeah, I know.  I'm odd.  I blame my mother, she taught me how to do them when I was 12 so I could decide where my furniture went when we moved and I've been doing it ever since.  You should see the one I made for the lab before we moved; it made the whole process super easy.  Anyway, my door diagram made it possible to calculate how much foam board I would need, how many colors of paint, and what sort of bits needed to be cut out.  All of that from one little sheet of graph paper.

For a good diagram you need to know the size object you're wanting to make and that means you need to know how much space you have where that object is going to go.  For my diagram, I measured how wide my hallway is where I want the door to be and I measured how tall my doors are (standard doors in the USA are 80 inches tall, that's 6 feet 8 inches).  I measured the doors instead of the height to the ceiling (which is also a standard measurement.  Most residential ceilings are 8 feet high unless custom designed or vaulted) because I didn't want to have to make something that big.  It would take more parts and be a lot harder to handle.  You also want to take note of anything in the area that might cause problems.  For instance, I have a built in linen closet where I want my door to go.  It's mostly flat, but it has some molding at the top which sticks out about 2 inches from the wall and that has to be considered.  For something like this you can usually get away with measuring things in 1/4 inch increments, the most precise I've ever been is 1/16ths of an inch.  You generally don't need to be that specific for crafty/prop things; extreme detail is better for things like window treatment measurements, floor plans, and other big (and important) projects.  Just make sure you measure everything the same way.  Don't round up sometimes and round down others, pick a system and stick with it.

Right.  So, I've measured my hall and found that my door has to fit in a space that is 34 inches wide and 80 inches tall.  But, since 34 inches is the exact width of the hallway and there is no way I could get the door positioned well if it's the same size as the hall, the door will have to be slightly smaller.  This is where some of the joys of graph paper come in.  The graph paper I used has a 1/4 inch grid.  That means there are 4 squares(in a row) to an inch.  To make the scale convenient I made 1 inch equal 1 foot.  In 12 inches there are 4 squares, 12 divided by 4 is 3 which makes each little block equal 3 inches in the real world.  You'll want to mark your scale (how many inches you set each block to) on your paper so you don't forget.  I've done that before and it's painful later.  And now, some math.  34 is not evenly divisible by 3 (my scale measurement), but 33 is.  I didn't just randomly pick 33 inches either.  If my door is 33 inches wide it will fit the 34 inch space and it will be exactly 11 squares wide on the graph paper.  34 inches would have been 11 and 1/3 squares and that's just obnoxious to deal with especially if you don't have to.  Same thing with the 80 inches high.  It isn't easily divisible by 3, but 81 is.  Since the door isn't going all the way to the ceiling it can be an inch higher than a door with no problems.  Again, this is a prop and not a real door.  You don't want to fudge a real door measurement like that but it's cool on a prop.

Having established that the door will be 33x81 that can be marked onto my grid (it comes out as 11 squares by 27 squares).   Once the perimeters are marked you can start transferring your door idea (see The Door: Part 1) to the graph paper.  The easiest patterns will have mostly straight lines, harder patterns will have curves.  I'm lazy on top of being a bit of a perfectionist so I opted not to have any curves at all.  Some of my pieces will need to be symmetrical and that is a lot easier to do with straight lines than curvy ones (I suck at free-handing symmetrical curves).  It will make your life easier if you use the grid lines as much as possible.  Try to use whole squares where ever possible, too.  I tried not to cut grid squares into smaller than half to keep it easy.


I haven't mentioned something yet which is really super important for this project.  Standard foam board, the kind you get at craft stores, is 20"x30" (in various thicknesses) and my door is 33"x81".  You see where that might be a problem.  30x80 would be no problem; I would just stack 4 boards along their 30 inch edges and viola!  30x80.  That is pretty much what I'm going to do, but to get the extra 3 inches side to side and the extra inch tall I have to be a little creative.  On the diagram you can see that the door is bordered by a black and yellow band.  That border is where my extra space is going to come from.  Thick of it like a license plate and  frame.  The plate (door base) is a standard size but the frame (the black and white part on the door) can be any size at all so long as it covers a part of the plate.  What you don't see on the diagram is that overlap.  On my door it ends up being a 1 1/2 inch overhang on each side (1 1/2 + 1 1/2= 3, 3+30=33) and a half inch overhang on the top and bottom ( 1/2 + 1/2 = 1, 80 + 1 = 81).  I know it helps if you can see what I'm talking about so I made a rough diagram in paint to demonstrate.

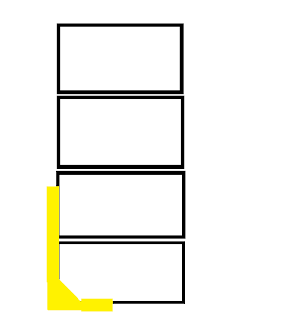
The rectangles represent the foam board base, the yellow is the foam board frame.  Using overlapping pieces like that will get the extra few inches and help with the next issue.

After that pic, the other problem should be glaringly obvious.  Seams.  There will be seams where the foam board is butted together to form the base and the frame.  Here's where it gets complicated.  If the seams for the frame and the door line up it will wreck the stability of the door.  You never want your weak points to line up like that.  Happily, it's really easy to account for seams on your diagram.  You already know that you can't have a piece that is more than 20 or 30 inches long, depending on the which side of the foam board you use, so you can sketch in where the seams would be.  You'll have to think about how it will actually be put together to do that, but now is as good a time as any for that.  You'd have to do it eventually anyway and it's better to do before you start cutting things out.  You should end up with something like this:


The red arrows mark the seams in the door base.  Notice how I've covered up as much of them as possible?  That's to give the door extra stability.  The door base pieces will be taped together on the back, but you can't do that on the front without it looking weird so instead you cover the seams with the decorative pieces.  I actually tweaked the diagram a little to make sure I got maximum coverage.  If you look you'll see little arrows on the piece shaped like an H and on the hexagon with the green center.  That's to tell me to move those pieces upward so that the seam by the H gets covered..  The added stability is worth it and it makes the seams nice and discreet.  I have also marked where the seams are for the frame, but they are really hard to see because the ends of the pieces follow the striping.  I planned it that way to make the seams stand out less on the frame because there is no good way to cover them. 

The other important thing to see on that diagram is that there are 4 seams on the door base, not the 3 you would get stacking 4 pieces of foam board.  I had to shift the boards so that I can cut the place where the door opens.  That's what the dark line between the middle two arrows is, the door opening.  It isn't really going to open, but I have to make it look like it can or the effect is lost.  To make it look good I didn't want any of that portion to be seamed which is why I had to shift the placement of the foam boards.  One board will be cut into 2 pieces, it's the only good way to make it work.

Once you're happy with the seam placement and overall look for your door you can start figuring out the size of the decorative pieces.  I did this by marking out one of each next to my door diagram and translating squares into inches.  You only need 1 stencil per piece type which will make things go faster.  My diagram has 6 red pieces on it, those are to be emergency door clamps, but they are all exactly the same size and shape so it would be silly to cut out 6 stencils when I only really need the 1.  It will also make sure that the 'identical' pieces stay that way, which wouldn't happen if multiple stencils were made for the same piece.

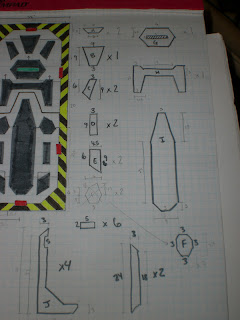
The two pieces on the bottom are the pieces for the frame.  You can see the angled edges and the notches for the door clips in the piece labeled "J".  That's how I'm going to fit it all together.  


Having the actual dimensions of the pieces is a handy thing for 2 reasons.  It will help with the stencils and it's also how you figure out how much building material you need.   I already know I need 4 sheets of foam board to make the door base, but how much do I need to the frame or the embellishment?  Using my diagram I can calculate that I can only fit 2 of piece J onto a single board, so I need 2 boards for that.  But I can get by with only those two boards for the frame because both of piece K (the long skinny one that I managed not to label) should be able to fit on one of the boards with the J pieces.  So we're now +2 sheets of  1/2" foam board.  If you want to get really fancy, you can make a diagram of how all your pieces need to be laid out.  Using the graph paper you can fiddle with the layout until you have as few cuts and as little foam board as possible.  Make sure you tape down your final layout so you don't forget where something goes and cost yourself extra material.


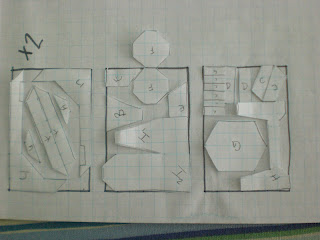
All my "pieces" laid out  to get an idea of how much foamcore would be needed.    The one piece that isn't in the line couldn't be made to fit but I didn't see the point of making another layout for a single piece.  At least I'll have some extra board in the event I mess something up!


All told I should need 7 sheets of 3/16" (4 for the door base and 3 for the cut outs) and 2 sheets of 1/2".  You want to figure how much material you need before you start making stencils because you may find that you need to change something to fit your budget or supplies.  If you can only afford 5 pieces of foam board and your project needs 15 it's better to find that out before you've started using your other materials. 

And that, ladies and gentlemen, is why diagrams are awesome.  Next up, stencils and construction!

Monday, July 2, 2012

The Door: Part 1

I've always believed that part of being a good hostess means ensuring that guests are as comfortable as possible.  That may seem like a really easy thing to do; air con on, check; food for everyone, check; plates and silverware for everyone, check.  How hard can it be?  Well, when it comes to my Halloween decorations it's a lot more involved than you would think. On top of dealing with allergies (both environmental and food) and dietary requirements (vegetarian, gluten free, etc) there are a number of physical and medical issues that I have to keep in mind.  For instance, I have a few very tall friends, one of whom is well over 6 feet tall, and that can be an issue when you're hanging things like spiderwebs.  I know I don't like getting a face full of spiderwebbing, so for things like that I have to make sure that my decs hang head and shoulders above my head.  Another friend has a seizure condition that can be triggered by blinking lights so I have to be careful there, and I also usually have at least one over night guest because I have awesome friends who come from out of town for my Halloween party.  This year, though, that means I get to make a door.

I had been contemplating doing that anyway because there is a section of hallway I want to block off for effect purposes.  It would either be a door or continuing the plastic sheeting at that particular point which would be a bit easier, if not nearly as neat.  Of course, it was around this point that I realized anyone staying in my guest rooms would have to interact with the blocking agent any time they wanted to enter or leave their room.  Even thinking about doing that sounds annoying.  The logical thing to do was to ask a usual guest which of my options would be the less annoying to have to deal with and go with whatever was chosen.  The door was picked and after I thought about it more the door is almost certainly the best choice.  You see, I don't take down my decs right after a party (Halloween doesn't come down until the first weekend in November) and a door at least would be moveable and not get in the way like the plastic sheeting would.  Plus it will give the plastic sheeting for the hallway something to connect to instead of just hanging.

I'd never tried to make something like a door before so I had something new to figure out.  It wouldn't do me any good to design an awesome door that I couldn't build so that was something I had to think about.  Also, my hallway is tiny.  It's 34 inches wide and that doesn't leave a lot of room for an awesome door.  The space for where I want the door is actually less than that because I have a built-in linen cabinet in that wall which will have to be taken into consideration too.  But first, I needed a plan.

Sitting down with Google image search I found a number of interesting sci fi doors so I pinned a number of them to my Pinterest Halloween board, it keeps the neat ones all in one place, and got to sketching.  I did 8 door sketches before I figured out what I really wanted.  If you're wanting to make something like this it's a good call to play with sketches first. You can see how many different ideas I played with before I decided on  something.


And this is the door that I want to make.  Don't mind the notes, that's my project sketch book.  I put as much as I can into it so I don't forget what I'm doing.  It isn't exactly like any of my preliminary sketches, but I really like it.  


Not a bad piece of work, really.  I even have an idea for how to build the thing.  Now all I have to do is get the parts and start construction.  Well, it isn't quite that easy.  There a surprising amount of work to do before I can actually build it.  More on that as it develops.