Pages

Sunday, September 30, 2012

The Unexpected Weekend Shinanigans

I had some grand plans for housework and prop making this weekend.  Unfortunately the housework got done but the prop work didn't go as expected.  We got an absurd amount of rain this weekend and that royally bollocksed up my ability to get things done.  Rain means high humidity and high humidity means no painting, staining, or paper macheing.  Unfortunately most of what I wanted to get done involved one or more of those.  It's a very depressing weekend when none of the fun bits go right and all of the boring bits do.  I couldn't even do some of the lighting work I had wanted to do, some vital parts went AWOL and my wire strippers are too large and clumsy.

I still wanted something to do, though.  As it was only Saturday at the time I grabbed the bone bag I acquired while running errands and pulled out the pieces to start trimming flashing off.  I got an idea for something fun to do with the skull.


A little work and I had the parietal bone off, or rather what would have been the parietal on a real skull.  I'm sure the plastic variety is only passingly anatomically correct.  I learned something rather important too.  If you're going to start cutting into plastic skulls you need to be super careful and even that may not be enough.  The way they're molded several seams meet up and that seems to cause an increase in thickness of the cast object.  Where it's just one seam it isn't so bad but when two seams meet up, that's a problem.  So much of one, in fact, that even though I was being as careful as it was possible to be I damn near took off a finger when the x-acto blade finally cut through the thick spot.  I managed not to cut myself but it was a much closer call than I would have liked.

Anyway, I did eventually get the parietal off and with a little work I was able to shore up the inside with some styrofoam and situate my light up brain inside.  The awesome bit is that I can take the brain out again and use the skull for other purposes if I choose.


Most distressingly the rain continued throughout the night and into Sunday.  Not that we don't need the rain, we do, but it was that damned humidity again.  So it was on to housework again.  My favorite thing.  Ugh.  It may give you an idea oh how much I like doing dishes and laundry that I started by cleaning my bathroom.  Still, it all had to get done.  It was very depressing.

In a fit of despondency I started milling about prodding at various prop bits.  I always find playing with Halloween things to be very soothing.  I hung up a few signs then I started hanging up my HAL-9000-esque 'eyes'.  After hanging up a color changing LED strobe I started trimming the flashing off my bag of body parts.  Honestly, it's starting to feel like everything I do requires flashing to be trimmed off.  It truly baffles me that me that so many prop making places (or one very busy one, I don't rightly know where they all come from) can't be bothered to make molds that seal better or take the time to get the flashing trimmed off.  Too much more of trimming and I'm going to start learning how to make casts and molds myself.

Anyway, having trimmed a hand the girls started playing with one of the mesh bags of parts that I had laying around.  It gave me a bit of a brain wave so I grabbed one of the pans I had gotten at the Dollar Tree a few weeks back.  Tossing everything together gave me this.


 Not bad, eh?  Things that can be thrown together are always so much fun.
 

But it wasn't until I started moving my glow bottles into the bathroom that the most amazing idea struck me.  I still had a sign that needed hanging and it occurred to me that one of the severed arms would make a fabulous, and amusingly appropriate, sign post.  A quick hunt in the garage yielded a bit of wood (it was a scrap of 2x4 from a closet shelf project) and a 2 inch wood screw.  Grabbing them, my drill, and a bit index I made a pilot hole and put the screw through the board.  The head of the screw stuck out too much for the board to sit level so I had to take it out and bore a space into which the screw head could be sunk.  Putting the screw back in showed the extra work paid off, it sat level.  The screw stuck up slightly more than an inch and was used to attach the arm to the board.  I did a bit of wrapping with some bloody bandages I had in my fabric box (yes, I have a Halloween fabric box and yes, the bandages were a DIY project) and it was ready for the sign.  I threaded some monofilament (aka fishingline)  through the sign, tied it, and hung it off the hand.  Perfectly delightful, don't you think?


And, if you're wondering, the cocoon wasn't neglected either.  It's just coming along more slowly than I would like because of the small hook/yarn size.


Tuesday, September 25, 2012

Unblinking Eyes...Yes, They are Watching You

Today is the best day in the history of best days.  Why?  Because Cassandra's tumor is benign!!  But, before we celebrate with a new pattern I have a confession to make.  I've been holding out on you.  All the time I've had no yarn bits to post?  Well, I kinda did.  I held it back for two reasons.  First, it is very definitely a close to October pattern.  Second, I noticed something the other day that gave me a great time to debut this pattern.  You see, today's post is a rather special one.  This post is #100!  How's that for a super awesome day of amazingness?

In honor of the milestone, I've got a really good pattern for you today.  Like I mentioned, I've been sitting on it for a while.  I came up with this idea in April (and made it in May) but knew instantly that it would be a great Halloween scarf.  I've found that seasonal stuff does better close to the season for which it is intended.  When I realized how close I was to my 100th post I figured this would be great for it.

I don't know if I'll ever manage to one up the Blood Scarf, to date that is the single most popular scarf on this blog (that post has had over 21,000 pageviews in the year it's been up), but there's no knowing until I try.  Unlike the Blood Scarf, this scarf doesn't take a massive amount of sewing.  You could even join as you go if you wanted.  I didn't make mine that way so that I could mix up my eye motifs before putting them together but I've included a note as to where you would do the join as you go.  You can also use the Staring Eye pattern to use up random amounts of yarn that you may have around.  You have two options if you start mixing yarn.  Keep the gauge the same so your eyes come out even or just go to town and see how it turns out with differently sized eyes.  You can make all the eyes one color, or alternate iris colors, or even do something like I did for the Tim Scarf and make it in two colors with one eye in a third color for an accent.  There are a bunch of options.


Staring Eye Scarf


Vanna's Choice 115 grams, about 200 yards
G hook

Gauge:  Each eye is 5 1/4 inches long and 4 inches wide.

A quick note before you get started, while you're making your eyes you will notice that they don't lie flat.  The way this pattern is designed the eyes round out a little to make them more three dimensional.  If you wanted you could sew 2 motifs together and make a coin purse or pouch. There are ls of possibilities.


Eye Motif
Ch2
Round 1:  8sc in first ch, join and turn (8sts)
Round 2:  2sc in each st, join and turn (16 sts)
Round 3:  sc1, 2sc around, join and turn (24 sts)
Round 4:  sc around, join and turn (24sts)
Round 5:  sc2, 2sc around, join and turn (32 sts)
Round 6:  sc around, join and turn (32 sts)
Round 7:  sc3, 2sc around, join and turn (40 sts)
Round 8:  ch 2, dc, hdc, sc17, (dc, ch 1, dc) in same st, hdc, sc 17, hdc, ch1, join to top of starting ch2 and turn
Round 9:  Ch2, hdc, sc2, sl st 13, sc2, hdc, dc, (dc, ch1, dc) in ch 1 of previous round, dc, hdc, sc2, slst 13, sc2, hdc, dc, (dc, ch1, dc) in ch 1 of previous round.  Join and break off.


Eye Coloring Options

The only rounds that have a set color are rounds 8 and 9.  Those need to be done in white (or whatever color you want the 'whites' of your eyes to be).  The size of the pupil and iris are very changeable so to give you an idea of what you can do I've included the round color coding for the ones I've done.


Pin-Point Pupil- Round 1 in black, Rounds 2-5 in color, Rounds 6-9 in white  
"Normal" Eye- Rounds 1 and 2 in black, Rounds 3-5 in color, Rounds 6-9 in white
Dilated Pupil- Round 1-3 in black, Rounds 4-5 in color, Rounds 6-9 in white
Hypnotic Eye- Alternate rounds of black and colr for Rounds 1-5, Rounds 6-9 in white
Rimmed Eye- Rounds 1-3 in black, Round 4 in color 1, Rounds 5-6 in color 2, Rounds 7-9 in white
Dotted Pupil- Round 1 in white, Rounds 2-3 in black, Rounds 4-5 in color, Rounds 6-9 in white


Sunday, September 23, 2012

Fun With Skeletons, Under $10 DIY

Alright, this is the project that made me feel like a badass.  Not because I managed it for crazy cheap (which I did) but because I got to prove to myself that I'm proficient with the most important of the power tools, the drill. But that's getting ahead of the story.  Today we start with this:


That little skeleton is quite possibly one of the best finds ever.  He is about 16inches tall and cost $1 at Dollar Tree.  I liked them so much I got three.  I also decided they needed a bit of work so out came the x-acto knife and I got started on making it look more like a real skeleton and less like blow molded plastic.


It isn't a huge difference, really, but I think they look nicer with visible ribs.  Then I went shopping, which was probably a mistake.  I found a better, if more expensive, skeleton that I instantly fell in love with.  Naturally, I bought it so I could use it for this project and I am ever so glad I did.


It's no contest really.  The nicer skeleton is the same height as the other and goes for $4.99 (at both Michael's and Walmart) but I should point out that using it instead more than doubles the cost of the project.  It would have been less than $5 had I not switched skeletons at the last second. 

$10 (or less) Skeleton Model


You will need:

1- small plastic skeleton  ($1 at Dollar Tree or $4.99 for the 'upgrade' at Michael's or Walmart)
1- 1/4" dowel rod, that is taller than your skeleton ($0.59 for a 36" dowel at Michael's)
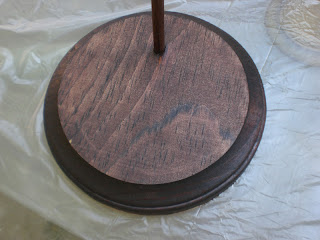
1- 5" flat, round bit of wood to use as a base ($1.29 at Michael's)
1- metal hanger and something with which to cut it
a drill with a 1/4" inch bit and a 1/16" or 3/32" bit
* x-acto knife
*small saw
*glue (wood glue and hot glue if you plan on doing it the technically correct way, just hot glue works for the truly lazy, like me)
*wood stain (The internet tells me you can get this for $4.77 at Lowes.  Walmart has it too but they don't have the price listed online and it might well be less.  Also, check your garage.  There's no telling what you might find.  I've found all kinds of random but useful stuff in mine.)

* These are optional parts which you may not need depending on how you go about assembly.  For instance I expected to need glue, but didn't, and you don't have to stain the stand though it does look nicer if you do.  I also already had them which is why they aren't added in the total cost.

Total cost : $6.87 with the fancy skeleton or $2.88 with the Dollar Tree skeleton.  You read that right, I checked the math twice.  It is actually possible to make a version of this prop for under $5.


The Bones

Regardless of which skeleton you use, they will likely need some cleaning up.  You already saw what I did with the cheapy skeleton but the fancy one needed a bit of work too.  There was a lot of flashing left on it from the molding process and it made the skeleton look fake.  Do yourself a favor, though, and leave the loop and/or string on the top of the skull.  If you don't you'll have to come up with another way to hang/attach the skeleton to the base.


Before
After
Looks much nicer, no?

The Stand

Every good educational model has a stand so I got a wood round and a dowel from the craft store.  I drilled a hole for the dowel so that it could act as the post.  A 1/4" bit for a 1/4" dowel makes a nice, snug peg hole that may not even need gluing.  Be careful not to go all the way through the base, I only drilled out between 1/4" and 1/2" down so that I wouldn't have to worry about the dowel slipping out the bottom.


Once you have the base prepped you can use your skeleton to measure off how tall a dowel bit you need.  You want it to be tall enough that your skeleton's feet hang at least 1/2 an inch above the base and there should be close to an inch sticking up over the skull.  Use a pencil to mark the height (go a bit high if you're worried, you can always cut it again) and then cut the dowel.  A helpful trick here is to cut from the end that doesn't have the price sticker on it.  That way you don't have to worry about getting the adhesive off.  Then you put the cut end into the base so the top is all nice and pretty.


Then it's outside to slap on a coat of stain.  The can will tell you the correct way to apply it (with the grain and wipe of excess after 5-15 minutes, it's easy).  While you're waiting for the stain to dry you can make the hanging hook.


This was truly a stroke of genius once I stopped being a moron.  I had been agonizing over how to hang the skeleton without it looking pathetically cobbled together.  I was going to cut a bit of metal hanger and shape it when I remembered that they are already perfectly shaped, as anyone who has ever turned a metal coat hanger into a toasting fork can tell you.  When you make a toasting fork out of a hanger you have to cut off or bend out the bits that stick into the cardboard tube.  I say cut them off and use them for this prop!


I scored the hanger at the length I wanted and used pliers to snap off the hook.  You may get to wait for a bit now because you need the stand to be dry enough to handle.  When it is get your eensy weensy drill bit and check to see how it compares to your metal hook.  It's OK if it's a bit smaller but you don't want it to be a lot bigger than the hook.  Once you've got a bit that looks about right carefully, very carefully, drill a shallow hole in the top of your dowel.  (This is the part that made me feel like a badass.  I'd never used a bit that small before and I was afraid that the dowel was going to split on me, but it didn't.  It worked!  All the random crap my parents taught me worked!!)


You can go slowly and test out the metal hook as you go.  (This is where you can correct "I cut the dowel too short" and "I drilled the hole too deep" problems.  Just cut off a longer bit of metal and use it to adjust the height.)  If all goes well the first time it should look about like this.


If your drill bit was a bit bigger than the metal you might want to put a dab of glue on the end of the metal before you stick it in so that it stays in one place.  Grab your skeleton and adjust the length of the string on its head so that it hangs where you want it to and trim off excess.


 And voila!


 One skeleton model and for far less than you'd pay to get a real one.  A 26 inch medical grade skeleton on a stand will run you $300-$400.  A 9ish inch teaching model will only set you back around $15 but that's without figuring shipping costs (Google estimates a final cost of about $28 with shipping).  Using the nicer skeleton and buying stain for this one will only cost you $11.64 (plus whatever your local taxes are, of course).  I would even argue that you could use this DIY model for basic biology classes; it appears to have all the major bones and unless you need to be able to see each vertebra and the individual carpals/metacarpals and tarsals/metatarsals it should get the point across.  Plus it has the advantage of being a $5 skeleton so there would certainly be no worry about kids handling it.  Enjoy!!

Yes, that is a light up brain and it's AWESOME!

Saturday, September 22, 2012

The Door: Part 4

I would love to start this post out with cocoon progress but I can't this week.  You see, Cassandra had to have surgery to remove what turned out to be a tumor on her neck.  It was small (about the size of a lentil) and had been shrinking (it started out the size of a chick pea) but hadn't gone away in the time the vet gave it to resolve on it's own.  I had hoped it would be a little fat pocket or something like that but no dice and we won't know if it's benign or malignant until the pathology results come back.  Cass got through everything just fine, though she was really woozy for a good long while and I'm pretty sure she hasn't forgiven me for taking her in to get cut on, but I did get a purr today so at least she doesn't hate me.

Cass wasn't terribly thrilled with having her picture taken
but she let me so long as I didn't try to take a shot of her
shaved surgical area.  You can see a bit of it on the left side of the photo,
the little red dot is the bottom of the incision.
As you can imagine, I've been a wreck.  I don't react well to unpleasant things happening to my girls.  Hell, I don't much care for leaving them alone over a weekend so you can imagine how jumpy I was about a surgery.  I had all week to stress over it and on the day of there was much anxiety until I heard from the vet.  That was around 2pm so I spent the vast majority of the day in sheer terror that something awful would happen to her on the table.  Then I spent the evening watching her to make sure she didn't have any problems coming off the remaining anesthesia and making sure she started eating again at some point.  And there was the whole neither cat recognized the other once they got home thing.  That was fun.  I had to keep them apart for several hours because they kept hissing at each other and the last thing we needed was a cat fight.  But, we're all doing great today.  The sisters have finally realized that they are sisters and that I didn't bring home the wrong cat and I've spent the whole day home making sure everyone got along and that recovery progressed positively.

I did try to keep myself distracted with craft projects but, unfortunately, crocheting didn't fit the bill.  Working on the cocoon wasn't a good distraction because I don't have to think about doing it which meant my brain could dwell on worst case scenarios and so on.  So I left the yarn alone this week and I did some Halloween stuff instead.  It usually takes a lot more thought and a lot more activity than yarn stuff which made it an ideal candidate for distraction.  I got absolutely no housework done but I got a couple projects finished and some others started.

The big deal is the door is (practically) done!  Ok, ok, it isn't ALL the way done but it's only missing the little red clamps and it is done enough that I was able to set it up.  For today's purposes that counts as done (I'll add a new pic or two when the clamps get done and added and that will be in about 2 weeks).

When we last left the door it was with a pic very similar to this.


The difference between then and now is that I've made some new side connectors on the frame and these ones fit!


Much hot gluing later and I was ready for a test run.  There had been some changes made so I had no idea how well the door was going to fit.  I was right, it didn't fit the way I expected.  I had to change where it was to go because my linen closet was in the way.  After a bit of exceedingly gentle finagling (that middle seam is nothing like as strong as I would like.  I'm probably going to have to add some reinforcement on the back.  I'll post the end results when I do) I got the door in place and stable enough to photograph.  The I got to stand back and enjoy the "I can't believe that worked!" moment.


Seriously, how cool is that?!!  The window turned out to be at exactly my eye height.  I have no idea how I managed that one.  However, I am really happy with how well it fills the hallway and I think it should work out well with the sheet plastic one all that goes up.  As thrilled as I am with how the door turned out, it might surprise you that this wasn't the project that made me feel like a badass.  I'm working on that post next and I should have it up in a day or two.  Apparently nervous energy is really good for getting stuff done!


Wednesday, September 19, 2012

Hedy Lamarr Sweater Inspiration

Here is today's proof that the cocoon is still underway.  Go, work in progress, go!  I know it looks a little odd, that's because I've joined it in such a way so as to make a foot pocket.  I also discovered that the ripple pattern may not have been the best idea for this idea but I'm continuing on anyway.  Stubbornness is fun like that.  (-:


Staying in the yarn vein, for once, the other day I was watching TCM movies (as usual, I do love them so) and there was Hedy Lamarr wearing the most lovely sweater (in H.M. Pulham Esq. from 1941).  I immediately did what any good knitter would do; I grabbed my camera and set to taking pictures.  That was actually a lot harder than it probably should have been.  Electronically speaking I live in the dark ages.  My main TV is about 16 years old and so not only does it not have anything like HD it also isn't flat and it feels like it weighs well over 100 pounds. As you can imagine taking pictures of a screen that old leads to some interesting things.  Like this, for instance.


No photographic trickery involved, just a plain digital camera and a really old TV.  Don't ask how I managed it, I really have no idea.  It's the only photo I took that day which ghosted.  The others turned out mostly OK but some of them had a line with a darker region.  It's not something you actually ever see on the TV but the slow moving line is something those who grew up on non-plasma, non-flat TVs are quite familiar with. The better "newer" tube TVs were good enough to not actually see that line, but it is still there and digital cameras can pick it up.  One of these days I'll get bored and look it up, I'm sure there's a technical term and an explanation as to what and why it is but I have no idea what they might be.


Isn't it cute?  I got a number of detail shots because, as you may have guessed, I want to try to make it at some point.  It looks quite warm and cozy.  I especially like how they made the collar.


I just love the way the collar pattern connects over the shoulders.  I just wish I had been able to get clearer images of the stitch pattern.  I don't think it's normal ribbing, there isn't enough contraction in the fabric, but I'm really not sure.  Naturally, I hadn't recorded this particular film so there's no going back and watching it again.  I plan to compare the best shots of the stitch pattern with some of my older knitting books and see what I can find.  I almost wonder if it was made with pairs of alternating rows of regular and reverse stockinette instead of traditional ribbing.


Hard to believe that the sweater is from 1941.  This is how you know when you've found a classic look.  Anything to which you go "OMG I WANT THAT" and which is over 70 years old is bound to be a keeper.  Now all I have to do is figure out how to make the thing.  Hopefully it goes better than my feeble, and failed, (multiple) attempts to make the crocheted dress that Heather Graham wore as Felicity Shagwell in the second Austin Powers movie.


Sunday, September 16, 2012

The Door: Part 3

Another week, another post.  I may be getting back into the swing of things at last.  Before I get on to the door, though, I do have progress to report lest you think I've stopped working on the crochetery.  As you can see, the cocoon is coming along nicely.


Obviously, it's going to take a bit more time before it's anything like done.   But it is still coming along.  I've got another 2 weekends of work put into my door of epic awesomeness, too.  It's going to take at least one more weekend for it to be done, but we're getting closer!

I found an awesome spray paint to use, I had planned to use regular grey paint but then I happened on Krylon's special purpose stainless steel spray paint and OMG.  This stuff is great.  Seriously, it even reflects light.  I'm pretty sure I'd think it was real metal on first glance if I didn't know better.  I painted all the bits long before I started gluing them together.  I've found that the less three dimensionality you have when spray painting the better off you are.  It's easier to hit all the edges and things when you can pick up the individual piece and move them about.


And how do you know I've been crafting all weekend?  Well, this is what happens when you pick up and move your pieces about to make sure they get an even coating of paint.


 Once all the bits were dry (and after another weekend went by so I could get the third can of paint because two wasn't enough) I laid out everything to get a feel for how I needed to put it together.  At this point I realized that my little window piece would work a lot better if I had cut through the door base.  So, while I had that piece laid out I traced the opening and x-acto knifed an opening.  Of course, I also couldn't find the thin sheet of plexiglass I had gotten to be the window so I haven't attached the window piece yet.


My biggest concern was keeping the base good and solid, so I did it first.  I butted the edges together and used hot glue on some scrap bits of foam board to hold the boards together (this is why you save everything that looks like it might be even remotely useful).  I went perpendicular to the seam to give it more stability and put a bead of hot glue along the seam to help keep light from passing through as well as to give a little more support. Going along the seam would have been risking a wobbly base that would have had a better chance of flopping over and breaking off.


I did the door base in halves because the faux opening edge was going to need some extra attention (and also I hadn't gotten my table stretched out long enough to hold the whole thing, 82 inches is a lot of door).  Once the pieces were secure I could position the embellishments on the front.  Critical point here, if you want the border and the embellishments to fit you have to try them out together.  Once they're glued there's no turning back so it's essential you get it right the first time.  But more on that later.


Yes, that is upside-down.  It was the most stable way to set it while I worked on the other piece.  You'll notice that the window cover hasn't been added yet.  That would be because at the time of that picture the plexiglass was MIA.  The important thing to look at is the seams on the front.  For added support I tried to put my embellishments over the seams.  The embellishments look a little small, I know, but keep in mind that the border will be taking up a portion of the edge which makes the visible area of the door smaller.

After I found the plexiglass I put the window in and did the final seam to attach the two halves of the door.

It's hard to take pictures of clear things, but there is plexiglass there.
 If you look closely you can see a reflection on it.


Unfortunately the final seam isn't very sexy, I've been calling it frankenseam.  Anyway, it's not as nice as the other seams for one very good reason.  The glued down side has been painted to match the front.  That seam has some space showing through and it was important to add colored bits for continuity.  It does take a bit of extra care when moving the door around because that seam isn't as stable as it could be.


That done I admired my handiwork before moving on to the next step.  You've got to admit it's pretty awesome.


The only thing that remained was to add my pretty frame.  I got all set up and laid everything out.


Sadly, I wasn't able to finish the door.  I was all excited, but no.  Have you spotted the problem yet?  I found it straight off.  The problem is this.
 

You got it.  The spacing was wrong.  Consequently, the door is going to take longer than planned.  Not that projects don't do that anyway.  I think what I'm going to have to do is make two new middle sections and have the stripes be a little thinner so that I can add some extra stripes to make the colors line up properly.  

So, lesson learned.  It would appear that the best way to finish up the door, should you choose to make one, is by putting the frame around it first and then put the embellishments on.  Hopefully next weekend it won't be too humid to paint things or this could get interesting in the bad way. It's getting closer to go time that I would like for there to be too many more setbacks.