Pages

Saturday, September 22, 2012

The Door: Part 4

I would love to start this post out with cocoon progress but I can't this week.  You see, Cassandra had to have surgery to remove what turned out to be a tumor on her neck.  It was small (about the size of a lentil) and had been shrinking (it started out the size of a chick pea) but hadn't gone away in the time the vet gave it to resolve on it's own.  I had hoped it would be a little fat pocket or something like that but no dice and we won't know if it's benign or malignant until the pathology results come back.  Cass got through everything just fine, though she was really woozy for a good long while and I'm pretty sure she hasn't forgiven me for taking her in to get cut on, but I did get a purr today so at least she doesn't hate me.

Cass wasn't terribly thrilled with having her picture taken
but she let me so long as I didn't try to take a shot of her
shaved surgical area.  You can see a bit of it on the left side of the photo,
the little red dot is the bottom of the incision.
As you can imagine, I've been a wreck.  I don't react well to unpleasant things happening to my girls.  Hell, I don't much care for leaving them alone over a weekend so you can imagine how jumpy I was about a surgery.  I had all week to stress over it and on the day of there was much anxiety until I heard from the vet.  That was around 2pm so I spent the vast majority of the day in sheer terror that something awful would happen to her on the table.  Then I spent the evening watching her to make sure she didn't have any problems coming off the remaining anesthesia and making sure she started eating again at some point.  And there was the whole neither cat recognized the other once they got home thing.  That was fun.  I had to keep them apart for several hours because they kept hissing at each other and the last thing we needed was a cat fight.  But, we're all doing great today.  The sisters have finally realized that they are sisters and that I didn't bring home the wrong cat and I've spent the whole day home making sure everyone got along and that recovery progressed positively.

I did try to keep myself distracted with craft projects but, unfortunately, crocheting didn't fit the bill.  Working on the cocoon wasn't a good distraction because I don't have to think about doing it which meant my brain could dwell on worst case scenarios and so on.  So I left the yarn alone this week and I did some Halloween stuff instead.  It usually takes a lot more thought and a lot more activity than yarn stuff which made it an ideal candidate for distraction.  I got absolutely no housework done but I got a couple projects finished and some others started.

The big deal is the door is (practically) done!  Ok, ok, it isn't ALL the way done but it's only missing the little red clamps and it is done enough that I was able to set it up.  For today's purposes that counts as done (I'll add a new pic or two when the clamps get done and added and that will be in about 2 weeks).

When we last left the door it was with a pic very similar to this.


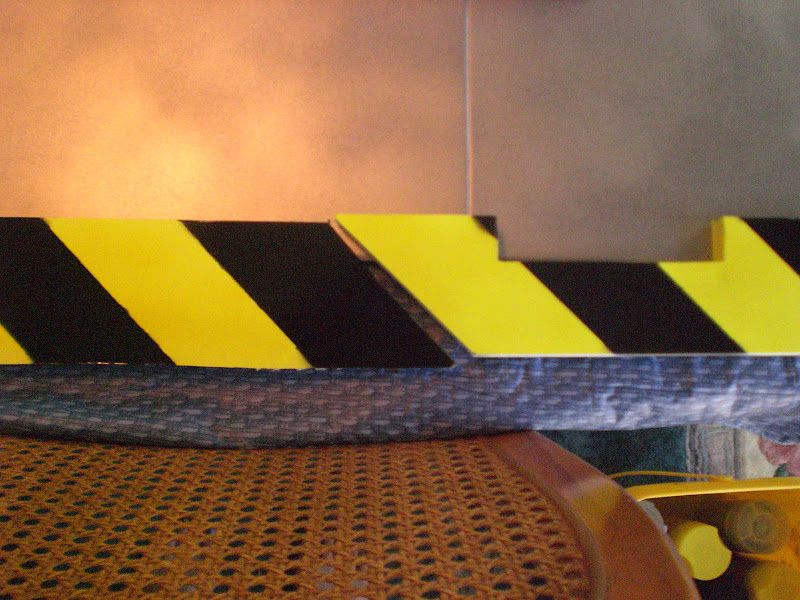
The difference between then and now is that I've made some new side connectors on the frame and these ones fit!


Much hot gluing later and I was ready for a test run.  There had been some changes made so I had no idea how well the door was going to fit.  I was right, it didn't fit the way I expected.  I had to change where it was to go because my linen closet was in the way.  After a bit of exceedingly gentle finagling (that middle seam is nothing like as strong as I would like.  I'm probably going to have to add some reinforcement on the back.  I'll post the end results when I do) I got the door in place and stable enough to photograph.  The I got to stand back and enjoy the "I can't believe that worked!" moment.


Seriously, how cool is that?!!  The window turned out to be at exactly my eye height.  I have no idea how I managed that one.  However, I am really happy with how well it fills the hallway and I think it should work out well with the sheet plastic one all that goes up.  As thrilled as I am with how the door turned out, it might surprise you that this wasn't the project that made me feel like a badass.  I'm working on that post next and I should have it up in a day or two.  Apparently nervous energy is really good for getting stuff done!


Wednesday, September 19, 2012

Hedy Lamarr Sweater Inspiration

Here is today's proof that the cocoon is still underway.  Go, work in progress, go!  I know it looks a little odd, that's because I've joined it in such a way so as to make a foot pocket.  I also discovered that the ripple pattern may not have been the best idea for this idea but I'm continuing on anyway.  Stubbornness is fun like that.  (-:


Staying in the yarn vein, for once, the other day I was watching TCM movies (as usual, I do love them so) and there was Hedy Lamarr wearing the most lovely sweater (in H.M. Pulham Esq. from 1941).  I immediately did what any good knitter would do; I grabbed my camera and set to taking pictures.  That was actually a lot harder than it probably should have been.  Electronically speaking I live in the dark ages.  My main TV is about 16 years old and so not only does it not have anything like HD it also isn't flat and it feels like it weighs well over 100 pounds. As you can imagine taking pictures of a screen that old leads to some interesting things.  Like this, for instance.


No photographic trickery involved, just a plain digital camera and a really old TV.  Don't ask how I managed it, I really have no idea.  It's the only photo I took that day which ghosted.  The others turned out mostly OK but some of them had a line with a darker region.  It's not something you actually ever see on the TV but the slow moving line is something those who grew up on non-plasma, non-flat TVs are quite familiar with. The better "newer" tube TVs were good enough to not actually see that line, but it is still there and digital cameras can pick it up.  One of these days I'll get bored and look it up, I'm sure there's a technical term and an explanation as to what and why it is but I have no idea what they might be.


Isn't it cute?  I got a number of detail shots because, as you may have guessed, I want to try to make it at some point.  It looks quite warm and cozy.  I especially like how they made the collar.


I just love the way the collar pattern connects over the shoulders.  I just wish I had been able to get clearer images of the stitch pattern.  I don't think it's normal ribbing, there isn't enough contraction in the fabric, but I'm really not sure.  Naturally, I hadn't recorded this particular film so there's no going back and watching it again.  I plan to compare the best shots of the stitch pattern with some of my older knitting books and see what I can find.  I almost wonder if it was made with pairs of alternating rows of regular and reverse stockinette instead of traditional ribbing.


Hard to believe that the sweater is from 1941.  This is how you know when you've found a classic look.  Anything to which you go "OMG I WANT THAT" and which is over 70 years old is bound to be a keeper.  Now all I have to do is figure out how to make the thing.  Hopefully it goes better than my feeble, and failed, (multiple) attempts to make the crocheted dress that Heather Graham wore as Felicity Shagwell in the second Austin Powers movie.


Sunday, September 16, 2012

The Door: Part 3

Another week, another post.  I may be getting back into the swing of things at last.  Before I get on to the door, though, I do have progress to report lest you think I've stopped working on the crochetery.  As you can see, the cocoon is coming along nicely.


Obviously, it's going to take a bit more time before it's anything like done.   But it is still coming along.  I've got another 2 weekends of work put into my door of epic awesomeness, too.  It's going to take at least one more weekend for it to be done, but we're getting closer!

I found an awesome spray paint to use, I had planned to use regular grey paint but then I happened on Krylon's special purpose stainless steel spray paint and OMG.  This stuff is great.  Seriously, it even reflects light.  I'm pretty sure I'd think it was real metal on first glance if I didn't know better.  I painted all the bits long before I started gluing them together.  I've found that the less three dimensionality you have when spray painting the better off you are.  It's easier to hit all the edges and things when you can pick up the individual piece and move them about.


And how do you know I've been crafting all weekend?  Well, this is what happens when you pick up and move your pieces about to make sure they get an even coating of paint.


 Once all the bits were dry (and after another weekend went by so I could get the third can of paint because two wasn't enough) I laid out everything to get a feel for how I needed to put it together.  At this point I realized that my little window piece would work a lot better if I had cut through the door base.  So, while I had that piece laid out I traced the opening and x-acto knifed an opening.  Of course, I also couldn't find the thin sheet of plexiglass I had gotten to be the window so I haven't attached the window piece yet.


My biggest concern was keeping the base good and solid, so I did it first.  I butted the edges together and used hot glue on some scrap bits of foam board to hold the boards together (this is why you save everything that looks like it might be even remotely useful).  I went perpendicular to the seam to give it more stability and put a bead of hot glue along the seam to help keep light from passing through as well as to give a little more support. Going along the seam would have been risking a wobbly base that would have had a better chance of flopping over and breaking off.


I did the door base in halves because the faux opening edge was going to need some extra attention (and also I hadn't gotten my table stretched out long enough to hold the whole thing, 82 inches is a lot of door).  Once the pieces were secure I could position the embellishments on the front.  Critical point here, if you want the border and the embellishments to fit you have to try them out together.  Once they're glued there's no turning back so it's essential you get it right the first time.  But more on that later.


Yes, that is upside-down.  It was the most stable way to set it while I worked on the other piece.  You'll notice that the window cover hasn't been added yet.  That would be because at the time of that picture the plexiglass was MIA.  The important thing to look at is the seams on the front.  For added support I tried to put my embellishments over the seams.  The embellishments look a little small, I know, but keep in mind that the border will be taking up a portion of the edge which makes the visible area of the door smaller.

After I found the plexiglass I put the window in and did the final seam to attach the two halves of the door.

It's hard to take pictures of clear things, but there is plexiglass there.
 If you look closely you can see a reflection on it.


Unfortunately the final seam isn't very sexy, I've been calling it frankenseam.  Anyway, it's not as nice as the other seams for one very good reason.  The glued down side has been painted to match the front.  That seam has some space showing through and it was important to add colored bits for continuity.  It does take a bit of extra care when moving the door around because that seam isn't as stable as it could be.


That done I admired my handiwork before moving on to the next step.  You've got to admit it's pretty awesome.


The only thing that remained was to add my pretty frame.  I got all set up and laid everything out.


Sadly, I wasn't able to finish the door.  I was all excited, but no.  Have you spotted the problem yet?  I found it straight off.  The problem is this.
 

You got it.  The spacing was wrong.  Consequently, the door is going to take longer than planned.  Not that projects don't do that anyway.  I think what I'm going to have to do is make two new middle sections and have the stripes be a little thinner so that I can add some extra stripes to make the colors line up properly.  

So, lesson learned.  It would appear that the best way to finish up the door, should you choose to make one, is by putting the frame around it first and then put the embellishments on.  Hopefully next weekend it won't be too humid to paint things or this could get interesting in the bad way. It's getting closer to go time that I would like for there to be too many more setbacks.

Monday, September 10, 2012

8 Reasons Why I Love the Dollar Tree

Whee, bonus post!  I can't help it, I had a really good time this weekend.  I went on a prop part gathering expedition that made me so incredibly happy I just had to share.  I got so much stuff and every piece of it is useful.  What is rather unusual is that I got the majority of my prizes from one place.  The Dollar Tree.  I have decided that Dollar Tree is my new favoritest store ever.  That being so, I naturally felt the need to share.  Not just that I got some good deals there, but why I like the store so much.  Honestly, I've found dollar stores in general to be under utilized.  I've never been in one that was what you would call busy and I find that to be a real shame.  I must admit, I'm a new devotee of the Dollar Tree.  I never really used the place to it's full potential either.  It's not quite on my normal path through town, making it easy to overlook, and they only take cash and debit cards, neither of which I generally have.  I'm going to be fixing that because Dollar Tree is amazing.  But first, an adorable cat!


Anyway, in my prop gathering euphoria I decided to make a list of reasons why I like the Dollar Tree and why it's worth a shot if you've never been to one.  I was going to try for 10 reasons but I could only get to 8 without repeating reason #1 over and over again (it's a pretty good reason, I think you'll agree).

  1.  First and foremost, everything in the store is $1.  Seriously.  Just $1, not a penny more not a penny less.  None of that $0.99 nonsense or random things that happen to be more or anything along those lines.  There are no price stickers, it's just all $1.
  2. They have a little bit of everything. It's like a teeny tiny Walmart in there.  They have food, spices, bakeware, tools, cleaning supplies, toiletries, floral stuff, school supplies, party supplies...well, you get the idea.
  3. Nothing is such high quality that you would worry about something happening to it.  I know we all generally prefer quality but hear me out of this one.  How many times have you gone to a party bearing food and then never see your serving dish again?  You can get cookie sheets, baking pans, and trays that are nicer than those toss-able aluminum ones but are cheaper than the aluminum trays at bigger stores.  Or what about having family over for something like Thanksgiving dinner and slowly losing all your food storage containers because Aunt Nettie can't remember which are hers and which are yours, Johnny college student put your 1980's non-microwavable Tupperware in the microwave, and you happened to drop a container of frozen turkey and the container shattered.  If you had gotten stuff on the cheap it wouldn't matter that half of it vanished into the either never to be seen or heard from again.
  4. Very short to non-existent lines.  Most people are just popping by to get a thing or three.  Since there's never a need to price check you can get in and out in an astonishingly short period of time.  The lack of frustration is totally worth it.
  5. Sometimes useful things come in 2 (or more!) packs...and it's still just $1 for the whole package!
  6. There are some brand name things to be found.  I routinely see Soft Soap there and they just started stocking Betty Crocker utensils.  I don't know how they manage it and I'm not sure I care.
  7. Different stores have slightly different stocks.  Admittedly, there is a certain soothing familiarity in big box stores that all have the same things in the same places and some people might find it frustrating not to find the same thing every time in every store.  I find that there is an inexpressible joy in finding new bits in unexpected places.  Had I not gone to both stores in my area I wouldn't have found the marvelous things I did and I wouldn't have been able to get out of the house to enjoy the nice weather we had.
  8. Their Halloween stuff is AWESOME.  I know, I know, you saw this coming.  They don't have a massive selection of Halloween funs but what they do have can be damn useful.  Take the Creepy Cloth for example.  I use Creepy Cloth for so many things.  It makes a great addition to the food table, you can drape it over draperies or over furniture, and I've even used it to swag doorways.  Unfortunately it tends to be freaking expensive for what it is (for those of you unfamiliar, Creepy Cloth is badly woven, ripped fabric.  It really looks great for decs).  Oriental Trading Company sells it for $5.25 for 4 yards, at Bog Lots it goes for $4 for 72 inches.  I've seen it for as much as $7, which is just obscene.  And they have it at the Dollar Tree.  $1 for 72 inches of Creepy Cloth is AMAZING!!  Oh, and did I mention they have decent skulls?  And bugs?  And pumpkin strobes?  And 8" plastic cauldrons?  It really is a prop source dream.  Their selection of cutesy Halloween is pretty good too, not that I ever use those (-;

A sample of the wonderful things that I procured.  The ears, flies,
snakes, spiders, and fingers are all part  of larger packages of the same.
The flies, for instance, came in packages of 25.  $1 for 25 flies!

This is Creepy Cloth.  Like I mentioned, it isn't exactly a brilliantly
made fabric but it gets the job done.
And there you have it.  Many of the bits I got will need a bit of touching up, the heart needs some better coloration and I'm thinking about corpsing a skull or 2 (I got 3) but really, it doesn't get much better than this.

Saturday, September 8, 2012

HAL-9000 and Time Travel

While I was sick over labor day I had a chance to catch up on the multitude of movies I had DVR'd.  One of the movies in the queue was 2010 which is a sequel to Stanley Kubrick's 2001: A Space Odyssey.  I do love me some sci fi movies.  Anyway, that kind of movie is great reference material for Halloween props.  2010 reminded me of the HAL-9000 unit and I got to thinking about trying to make a similar prop.

Before I get to that, though, I have something else to show.


See?  I really have been crocheting.  The pattern is coming along slowly but it is being made.  You'l have to be a little patient with this one.  The end product is going to be quite large and so is going to take a while to get it finished.  But, I wanted to let everyone know that I haven't forgotten about the whole patterns thing, I promise.  Right, back to the props.

A few weeks ago I had purchased a small clock to take the works out of for another prop but I had saved the clock case.  Good thing, too.  It turns out it was absolutely perfect for what I needed. 


A bit of high gloss black spray paint and a red LED later and voila!  Something that looks like a blend of HAL-9000 and GLaDOS (the computer/villain from Portal, for all you non-nerds).  


There was something in the look of it that wasn't quite right so I hit the white case with some silver.  That didn't do it, either.  It was too shiny.  Since I had some stainless steel spray paint (I really do love Krylon, they have a paint for everything it seems) I put a layer of that over the silver.  Much improved.  Then I got some glass frosting spray paint (Krylon again.  I really did mean it when I said they had a paint for everything) and used that on the clear plastic cover.


This will be closer to how the prop will actually be displayed.  
I plan to hang it from the wall with a command hook.
It really is a great little prop.  I like it so much, in fact, that I'm making a few more.  Since I broke the works in the first clock (it wouldn't stop alarming and the bit I took out was, apparently, the wrong one.  The clock stopped alarming, but it wouldn't tick either) I needed to get another clock anyway.  I picked up 2 more, another good call as I'm still fighting with one of the two.  It won't surrender the clock face insert.  I may need to get boy hands to help me, mine don't seem to be strong enough for the last clock.  I was able to take  the other one apart and use it to finish the other prop and make another HAL-9000 eye.

Since I keep alluding to the inner bits of the clock I figured I should show you what what I did with the works.  Yay, double prop post!


That's my $1 find of epic amzingness, if you missed that post.  I found it at a garage sale a while back and all I had to do was put works in it.  I had a devil of a time finding works with hands small enough for the clock face.  The only ones small enough that I could find are the ones I used, that's why the hands are silver.  It was the only color option and I didn't want to chance the hands sticking or scraping if I painted them.  You're probably wondering why I had to disarm the alarm clock if all I did was use the works.  Well, that's not quite all I did.  You can't see it from the picture, because pictures are stills and I'm far to lazy to make a video, but that clock is currently running backward.  I found an instructable that shows how to make a clock run counter-clockwise.  You can find it here.  It's really very easy.  I've successfully made 3 clocks that go backward without breaking any of them in the process.  Even the clock I eventually broke ran backward with no trouble before I took out the wrong bit and killed it.  Of course, now I can't see a quartz clock and not want to take it apart and make it go the wrong way.  (-:  It's good fun.

Sunday, September 2, 2012

Back to Work!

Well, here I am.  The world's biggest slacker.  I've been back from vacation for a while now and I'm settling back into something like a normal schedule.  Which, I suppose, means that I can't keep putting off posting.  I don't have any fun and exciting new patterns or props going on at the moment so you're stuck with some rather...macabre... photos, but more on them in a bit.

I have been bad about making yarn things lately.  Like so many other of my hobbies it tends to go in cycles and I've been on more of a reading kick lately.  There is a new catalyst for crafting which should help me pick up on the yarn crafting.  You see, I recently joined the rest of humanity in getting a DVR.  No more messing around with old VHS tapes for me.  It also means that I can tape things when I'm not home (ye old  TV VCR doesn't have a functioning clock so it can't be programmed and I would have to be home to make it tape).  In a short number of days I've managed to accumulate a large number of movies that need to be watched.  As there are several which I've not seen before I won't be able to read while they're on and I get very fidgety if I have nothing to do so back to the yarn it is!

In fact, I've started a crochet project today that should prove interesting.  In typical me fashion I've managed to screw up a 3 day weekend by getting sick.  I was fine for the first half of the day which makes it more frustrating because I thought I'd get to get a lot of things done today when I woke up.  When I don't feel well the usual process is to spend the majority of the day passed out on my couch, drinking sprite and watching movies during my moments of consciousness. It's the sleeping part that really got me thinking for a project.  Almost all my blankets are crocheted but they tend to be either on the heavy side or much to small to comfortably curl up in for naps.  To that end, I've begun work on a cocoon of sorts which (in theory) will keep me nicely tucked in without being stiflingly hot.  I do expect that it will take some time to get the cocoon done and the pattern up to scratch so that people besides myself can decipher it.

In the mean time, I've got some pics I took while on vacation.  Me being me, I managed to neglect taking pictures of anywhere that we went or where we stayed.  For some reason I've just never been good at remembering I have a camera.  One thing got enough enthusiasm for me to request a special trip for photo taking, though.  The area where we were has had people for a very long time and consequently has some really awesome graveyards.  At my request we had 'cemetery day' so that I could get some reference pictures for props.  It's rather odd, I admit, but when am I not doing odd things?

So as not to bore everyone I selected a few of my favorites from the multitude to share.  Personally I find old cemeteries to be fascinating, and I know there are others who would agree.  And, who knows?  There may be other twisty people out there that need some early Halloween inspiration.


I took a couple of general shots to get a feel for how the place was laid out.  I'm big on authenticity for certain types of props and tombstones are one of the majors.  In order to make a truly creepy graveyard there has got to be substantial similarity to how they really look.  Stones places too closely together look just as fake as one or two stones scattered about.  Cemeteries are surprisingly ordered, everything in neat rows, and the older ones are no exception.  The other super important thing is that the gravestones are very seldom identical.  They may seem similar at a distance, but unless there is a pair or a family group the majority of the stones only match superficially.


Here is something that I had never seen before.  I don't spend a lot of time in graveyards but I have been in a fair number of them (go, elementary school local history studies!) plus I saw and visited a number of tombs and catacombs on a trip my family made to Italy.   While I'm not an expert by any means, I hadn't seen names carved on top of a gravestone before.  It was really common in this particular cemetery, especially with family groups.  There were some family groups where the mother and father would have all the requisite information (death date, age, etc) but then the stones of (presumably) the children wouldn't necessarily have information on the fronts, but rather had their given names carved on the top of the stone.

These stones had interesting size and texture.  The one on the left is quite small, no more than 2 feet high at the most.  I especially like the moss that covers it.  Most of the prop tombstones you see may be designed to look old but none of them do.  It's always the same gray styrofoam, unless you make them yourself.  That's what makes the weathering so important; it's the only way to make things look convincing.  The photo on the left shows something a bit different.  It seems that tombstones used to be quite a bit thinner than they are nowadays.  The foremost stone couldn't have been much over an inch thick and there were several stones that were thinner (though they don't appear to have held up all that well).


I think this next pair is a great example of what I meant about stones being similar from afar but really very different when you see them up close and personal.  A quick look shows a "traditional" tombstone shape but once you start looking at the style of the engraving and the proportions of the stones, they couldn't be more different.  What I find more stunning is that, if the stones were actually placed when the person was interred and that they haven't been replaced (some stones had very obviously been replaced, you could tell by the more modern styling and granite that was used plus birth/death dates in the 1800's), these stones are only 3 years apart from each other and the younger stone has more ornate engraving.


The other thing that I find interesting is the number of different styles of engraving that were used.  Take this stone, for instance.  The deceased's name is in one style, his parents' names in another, and his date of death and age in yet another.  The use of multiple engraving styles appears to have been very common.  Among the older stones finding only one style of engraving was remarkable in it's rarity.


The one problem with the multiple engraving styles is that they seem to weather at different rates.  With some of the stones that creates a real issue.  Take this stone as an example.  First off it's very old, from the 1830's if it was placed at the time of interment.  The rusted red border on each side are metal supports which are wired together to help hold the stone up and you can see where the stone itself has been repaired.  This is the sort of damage that was present on a number of the older, thinner stones.  The bolder text in which the deceased's name (Mary) is written is still legible but the more ornate script is much more worn away.  The most I've been able to make out is "DIED Sept 14 1830 Aged 41 years 1 mo".  From the other stones that had similar time frames the space between her name and date of death should be something to the effect of "wife of X" or "daughter of Y" and there is very likely a "# days" that follows the "1 mo" on the age at death.  Following the age is likely a bit of scripture or a saying pertinent to the family but it's so worn and damaged it would take better eyes than mine to decipher it.

This stone is probably my favorite.  The level of detail in the carving, worn as it is, is captivating.  It was by far the most intricate stone I found for someone of that age.  Carrie Lou was only 2 years old when she died, that in itself wasn't uncommon for the time period, but what was different was the level of embellishment.  It isn't a large stone, probably just under 2 feet tall, and I saw a number of stones for children that were far larger with much more ornate engraving.  It's the "extra" carving on this one, the dove and olive branch, that made it unique.  From a crafting point of view the lichen and weather stains make it even more fantastic.  If you look at the black marks between the IE of Carrie and the E in died you may notice a woman's face and form in the black weathering, I know my eyes matrixed one there.  (Matrixing is when your eyes/brain try to make a vague image into a familiar shape.  It's the same as seeing shapes in clouds but in the realm of paranormal studies it often happens in the tarnish of old mirrors or, in this case, in the weather stains on a gravestone.)


SO, yeah. Not exactly your average family vacation photographs, but far more interesting I feel.

Thursday, August 16, 2012

Super Fast Emergency Ear Warming Headband

As you may have noticed my posting has been even more sporadic than usual.  What is unusual is that I actually have good reason instead of just "I'm lazy".  I've been on vacation!  My parents and I go to visit family once a year and this time we rented a lake house so we could have our family visit us instead of just crashing with them.  The other benefit of a lake house is the lake part.  I like water and I don't often get to play in it.  I've also not gone fishing in a very, very long time.  Probably close to 8 years or so.  Well, since the lake house has a dock and an itsy bitsy row boat we decided to do some fishing.

No, this is not a fishing story blog post.  The fishing part is important because it's why I made what I did but I'm not going to spin a yarn about the one that got away (although that happened a fair number of times, lousy fish).  The bigger issue is that our family is from the north east, I live in the midwest. It's freaking COLD there.  And, because lake houses tend to be on lakes, a constant cold breeze coming off the water presents some problems.  All of this sounds really great, and it is a nice change, but I get wicked headaches when my ears get cold.  As it's summer I hadn't packed anything like ear warmers but with the wind I knew I needed them.  This is why I yarn craft; you're never cold for very long if you can make things out of yarn.

Today I have for you my Super Fast Emergency Ear Warming Headband.  How quickly can you make it?  In about the amount of time it takes your dad to drink a cup of coffee and give a row boat a once over to get the spider webs out.  Hopefully I didn't write this one too sloppily.  It's a really simple pattern and the only reason it looks cute at all is because it's faster to work clusters than it is to work rows of single crochet.  The only part that really needed to be thick was over the ears themselves.  I do hate being cold.

Super Fast Emergency (Fishing) Ear Warming Headband


Materials:
G-hook
small amount of Vanna's choice (probably a quarter of a ball, maybe less)

Directions:

Ch 11
Dc across starting in the 3rd st from hook ( 9 dc counting the ch2 as a dc). Turn.
Work a total of 5 rows of dc over 9 sts.
Sl st over 2 sts, ch2, 2dc in same st as ch.  Ch1, skip 3 sts, 3dc in the next st.  Turn.
**Sl st to the ch 1, make a 3dc cluster in the ch 1.  Turn
Ch2, 2dc in the same st.  Sk 1 dc, 3 dc cluster in the last dc.  Turn.**
Repeat from ** to ** 4 more times, ending on a 2 cluster row.
Ch2 and dc (increase) in the same st.  Dc across including in the space between the clusters and make 1 dc increase in the last st.  You should now have 9 sts.
Work 4 more rows in dc across 9 sts.
Sl st 3, ch 2, dc in the next 2 sts.  (3 dc counting the ch 2) Turn.
Work even in dc over 3 sts for 10 rows.
Sl st the 3 dc band to the center 3 dc on the starting edge.  Break off, weave in ends.


Instant warm.  Well, warmer.  Enjoy!